From www.redheart.com
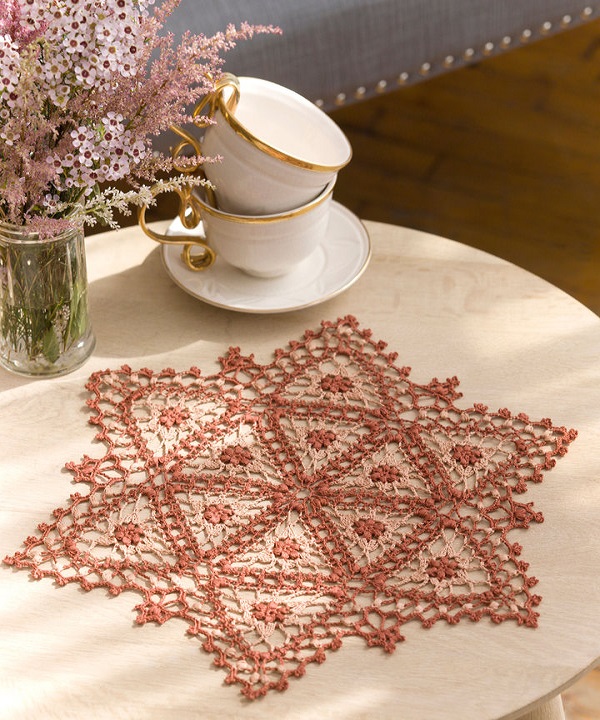
Fairfax Doily
Two beautiful shades of crochet thread are combined in this gorgeous doily design. It’s perfect for adding a touch of elegance to dining or living areas of your home.
Pattern #: LC4572
Designed by: Kathryn A. White
Project Type: Doilies
Skill Level: Experience
Required Supplies:
- AUNT LYDIA’S® Classic Crochet Thread, Size 10: 1 ball 341 Russet A and 1 ball 310 Copper Mist B
- Susan Bates® Steel Crochet Hook: 1.5mm [US 7]
- Tapestry needle
Doily measures 16½” (42 cm) in diameter.
Special Abbreviations
beg puff st (beginning puff st) = draw up a loop the height of a dc, [yarn over, insert hook into indicated stitch or space, draw up a loop the height of a dc] 5 times, yarn over, draw through all 11 loops on hook, ch 1 to close stitch.
puff st = [yarn over, insert hook into indicated stitch or space, draw up a loop the height of a dc] 6 times, yarn over, draw through all 13 loops on hook, ch 1 to close stitch.
4-tr cl (4-treble crochet cluster) = holding the last loop of each st on the hook, 2 tr in same ch-4 space, 2 tr in next ch-4 space, yarn over, draw through all 5 loops on hook.
4-dc cl (4-double crochet cluster) = holding the last loop of each st on the hook, 2 dc in same ch-4 space, 2 dc in next ch-4 space, yarn over, draw through all 5 loops on hook.
5-dc cl (5-double crochet cluster) = holding the last loop of each st on the hook, 2 dc in same ch-4 space, 3 dc in next ch-4 space, yarn over, draw through all 6 loops on hook.
ch-3 picot = ch 3, slip st in top of indicated st. ch-4 picot = ch 4, slip st in top of indicated st.
etr (extended treble crochet) = yarn over twice, insert hook into indicated stitch or space, yarn over and pull up a loop (4 loops on hook), yarn over and draw through 1 loop on hook (4 loops on hook), [yarn over and draw through 2 loops on hook] 3 times.
joining picot = ch 1, slip st in next picot on adjoining Motif, ch 1, slip st in top of last dc made.
2-tr joining = holding the last loop of each st on the hook, tr in next ch-5 space on current Motif, tr in next ch-5 space on next outside Motif, yarn over, draw through all 3 loops on hook.
triple picot = ch 4, slip st in top of last stitch made, ch 5, slip st in the same st again catching the front loop of the first ch-4 loop, ch 4, slip st in the same st again catching the front loop of the first ch-4 loop and ch-5 loop.
dtr (double treble crochet) = yarn over 3 times, insert hook into indicated stitch or space, yarn over and pull up a loop (5 loops on hook), [yarn over and draw through 2 loops on hook] 4 times.
dtr joining = holding the last loop of each st on the hook, dtr in next sc, skip next 9 sc, dtr in next sc, yarn over, draw through all 3 loops on hook,
Note
Motifs are joined as they are worked. To make finishing easier, weave in all ends as each section of each Motif is completed.
DOILY
Motif #1
(Beginning Motif in Center Section)
With A ch 5; join with slip st in first ch to form a ring.
Round 1 (Right Side): Ch 1, [sc in ring, ch 2] 6 times; join with slip st in first sc—6 sc, 6 ch-2 loops.
Round 2: Slip st in first ch-2 space, beg puff st in same ch-2 space, *ch 4, puff st in next ch-2 space; repeat from * around; ch 4, slip st in top of beg puff st. Fasten off and weave in ends.
Round 3: With Right side facing, attach B in any ch-4 space, *ch 3, 4-tr cl, ch-4 picot in top of cluster just made, ch 4, slip st in same ch-4 space, ch 2, 4-dc cl, ch-4 picot in top of cluster just made, ch 3, slip st in same ch-4 space; repeat from * once, ch 3, 4-tr cl, ch-4 picot in top of cluster just made, ch 4, slip st in same ch-4 space, ch 2, 5-dc cl, ch 1, dc in top of cluster just made to form final picot.
Round 4: Ch 1, sc in picot just made, *ch 5, etr between clusters in next ch-4 space of Round 2, ch 5, (tr, ch 7, tr) in next picot, ch 5, etr between clusters in next ch-4 space of Round 2, ch 5, sc in next picot; repeat from *, ch 5, etr between clusters in next ch-4 space of Round 2, ch 5, (tr, ch 7, tr) in next picot, ch 5, etr between clusters in next ch-4 space of Round 2, ch 5, slip st in first sc. Fasten off and weave in ends.
Round 5: Attach A in first sc of previous round, ch 5, slip st in 2nd ch from hook (counts as dc and picot), *ch 2, dc in next ch-5 space, ch 2, dc in next etr, ch-3 picot in last dc made, ch 2, dc in next ch-5 space, ch 2, dc in next tr, ch-3 picot in last dc made, ch 2, (dc, ch 2, puff st, ch 5, puff st, ch 2, dc) in next ch-7 space, ch 2, dc in next tr, ch-3 picot in last dc made, ch 2, dc in next ch-5 space, ch 2, dc in next etr, ch-3 picot in last dc made, ch 2, dc in next ch-5 space, ch 2**, dc in next sc, ch-3 picot in last dc made; repeat from * once, then repeat from * to **, slip st in 2nd ch of beginning ch- 5. Fasten off and weave in ends.
Motif #2
(One-Sided Joining Motif in Center Section)
Rounds 1-4: Same as Motif #1.
Round 5: Attach A in first sc of previous round, ch 5, slip st in 2nd ch from hook (counts as dc and picot), ch 2, dc in next ch-5 space, ch 2, dc in next etr, ch-3 picot in last dc made, ch 2, dc in next ch-5 space, ch 2, dc in next tr, ch-3 picot in last dc made, ch 2, (dc, ch 2, puff st, ch 5, puff st, ch 2, dc) in next ch-7 space, ch 2, dc in next tr, ch-3 picot in last dc made, ch 2, dc in next ch-5 space, ch 2 dc in next etr, ch-3 picot in last dc made, ch 2, dc in next ch-5 space, ch 2, dc in next sc, ch-3 LC4572 Fairfax Doily picot in last dc made, ch 2, dc in next ch-5 space, ch 2, dc in next etr, ch-3 picot in last dc made, ch 2, dc in next ch-5 space, ch 2, dc in next tr, ch-3 picot in last dc made, ch 2, (dc, ch 2, puff st) in next ch-7 space, ch 2, holding Wrong sides together slip st between puff sts in any ch-5 space on previous Motif, ch 2, (puff st, ch 2, dc) in same ch-7 space on current Motif, ch 2, dc in next tr, joining picot, ch 2, dc in next ch-5 space, ch 2, dc in next etr, joining picot, ch 2, dc in next ch-5 space, ch 2, dc in next sc, joining picot, ch 2, dc in next ch-5 space, ch 2, dc in next etr, joining picot, ch 2, dc in next ch-5 space, ch 2, dc in next tr, joining picot, ch 2, (dc, ch 2, puff st) in next ch-7 space, ch 2, slip st between puff sts in next ch-5 space on previous Motif, ch 2 ,(puff st, ch 2, dc) in same ch-7 space on current Motif, ch 2, dc in next tr, ch-3 picot in last dc made, ch 2, dc in next ch-5 space, ch 2, dc in next etr, ch-3 picot in last dc made, ch 2, dc in next ch-5 space, ch 2, slip st in 2nd ch of beginning ch-5. Fasten off and weave in ends.
Motifs #3-5
(One-Sided Joining Motifs in Center Section)
Rounds 1-4: Same as Motif #1.
Round 5: Same as Motif #2, working the first slip st joining between puff sts in the ch-5 space of the first joining of previous Motif.
Motif #6
(Two-Sided Joining Motif in Center Section)
Rounds 1-4: Same as Motif #1.
Round 5: Attach A in first sc of previous round, ch 5, slip st in 2nd ch from hook (counts as dc and picot), ch 2, dc in next ch-5 space, ch 2, dc in next etr, ch-3 picot in last dc made, ch 2, dc in next ch-5 space, ch 2, dc in next tr, ch-3 picot in last dc made, ch 2, (dc, ch 2, puff st) in next ch-7 space, ch 2, holding Wrong sides together slip st between puff sts in the ch-5 space on outside edge of Motif #1 so current Motif will fit between Motifs #1 and #5, ch 2, (puff st, ch 2, dc) in same ch-7 space on current Motif, ch 2, dc in next tr, joining picot, ch 2, dc in next ch-5 space, ch 2, dc in next etr, joining picot, ch 2, dc in next ch-5 space, ch 2, dc in next sc, joining picot, ch 2, dc in next ch-5 space, ch 2, dc in next etr, joining picot, ch 2, dc in next ch-5 space, ch 2, dc in next tr, joining picot, ch 2, (dc, ch 2, puff st) in next ch-7 space, ch 2, slip st between puff sts in next ch-5 space on Motif #1, slip st between puff sts in next ch-5 space on Motif #5, ch 2, (puff st, ch 2, dc) in same ch-7 space on current Motif, ch 2, dc in next tr, joining picot to Motif #5, ch 2, dc in next ch-5 space, ch 2, dc in next etr, joining picot, ch 2, dc in next ch-5 space, ch 2, dc in next sc, joining picot, ch 2, dc in next ch-5 space, ch 2, dc in next etr, joining picot, ch 2, dc in next ch-5 space, ch 2, dc in next tr, joining picot, ch 2, (dc, ch 2, puff st) in next ch-7 space, ch 2, slip st between puff sts in next ch-5 space on Motif #5, ch 2, (puff st, ch 2, dc) in same ch-7 space on current Motif, ch 2, dc in next tr, ch-3 picot in last dc made, ch 2, dc in next ch-5 space, ch 2, dc in next etr, ch-3 picot in last dc made, ch 2, dc in next ch-5 space, ch 2, slip st in 2nd ch of beginning ch-5. Fasten off and weave in ends.
Motifs #7-12
(Point Motifs on outside of Center Section)
Attach one Motif to each outside edge of Motifs #1-6.
Rounds 1-4: Same as Motif #1.
Round 5: Same as Motif #2, working the first slip st joining between puff sts in the ch-5 space of the outside corner of a Motif in the center section.
Edging
Round 1: With Right side facing, attach A in the first dc without a picot at the bottom right of any outside Motif, ch 1, sc in same dc, [ch 7, skip dc with picot, sc in next dc] 5 times, (ch 7, sc, ch 7, sc) in next ch-5 space, ch 7, sc in next dc, [ch 7, skip dc with picot, sc in next dc] 5 times, ch 3, 2-tr joining, ch 3, *sc in next dc, [ch 7, skip dc with picot, sc in next dc] 5 times, (ch 7, sc, ch 7, sc) in next ch-5 space, ch 7, sc in next dc, [ch 7, skip dc with picot, sc in next dc] 5 times, ch 3, 2-tr-joining, ch 3; repeat from * around, slip st in beginning sc. Fasten off and weave in ends.
Round 2: Attach B in the first ch-7 space of Round 1, beg puff st, [ch 5, puff st in next ch-7 space] 6 times, ch 5, puff st in same space, [ch 5, puff st in next ch-7 space] 6 times, ch 1, *puff st in next ch-7 space, [ch 5, puff st in next ch-7 space] 6 times, ch 5, puff st in same space, [ch 5, puff st in next ch-7 space] 6 times, ch 1; repeat from * around, slip st in top of beginning puff st. Fasten off and weave in ends.
Round 3: Beginning Motif Point
Attach A in the ch-5 space on the tip of any Point, ch 1, (3 sc, ch-3 picot in last sc made, 3 sc, triple picot in last sc made, 3 sc, ch-3 picot in last sc made, 2 sc) in same space.
Motif Side
*(4 sc, triple picot in last sc made, 3 sc) in next ch-5 space; repeat from * 3 times.
Picot Trim Between Motifs
[7 sc in next ch-5 space] 2 times, 3 sc in next ch-1 space, 7 sc in next ch-5 space, 3 sc in next ch-5 space, ch 4 (counts as a st), turn; skip next 5 sc, dtr joining, ch 4, skip next 5 sc, sc in next sc, slip st in next sc, ch 1, turn; 5 sc in next ch-4 space, sc between the 2 dtr of dtr joining, 3 sc in next ch-4 space, ch 3 (counts as a st), turn; skip next 2 sc, (puff st, ch 3, puff st) in next sc, ch 3, skip next 2 sc, sc in next sc, slip st in next sc, ch 1, turn; (3 sc, ch-3 picot in last sc made, 2 sc) in next ch-3 space, (3 sc, triple picot in last sc made, 2 sc) in next ch-3 space, (3 sc, ch-3 picot in last sc made, 2 sc) in next ch-3 space, 2 sc in next ch-4 space, 4 sc in next ch-5 space.
Repeat Motif Side.
Motif Point
(3 sc, ch-3 picot in last sc made, 3 sc, triple picot in last sc made, 3 sc, ch-3 picot in last sc made, 2 sc) in next ch-5 space.
Continue working Edging, repeating [Motif Side, Picot Trim Between Motifs, Motif Side, Motif Point] 4 times, then [Motif Side, Picot Trim Between Motifs, Motif Side] once; slip st in first sc of Beginning Motif Point. Fasten off and weave in ends. Block Doily to size and shape.
ABBREVIATIONS
A, B = Color A, Color B; ch = chain; cm = centimeters; dc = double crochet; mm = millimeters; sc = single crochet; st(s) = stitch(es); tr = treble (triple) crochet; ( ) = work all directions in parentheses in the indicated stitch or space; [ ] = work instructions within brackets as many times as directed; * or ** = repeat whatever follows the * or ** as indicated.
Be sure to…
Visit my Website
Join me on Facebook
Subscribe to the Maggie Weldon YouTube Channel for more crochet lesson videos
Subscribe to Maggie’s Crochet YouTube Channel for product reviews
Sign Up for My Newsletter
Follow us on Pinterest
Follow us on Twitter

No Comments