From RedHeart.com
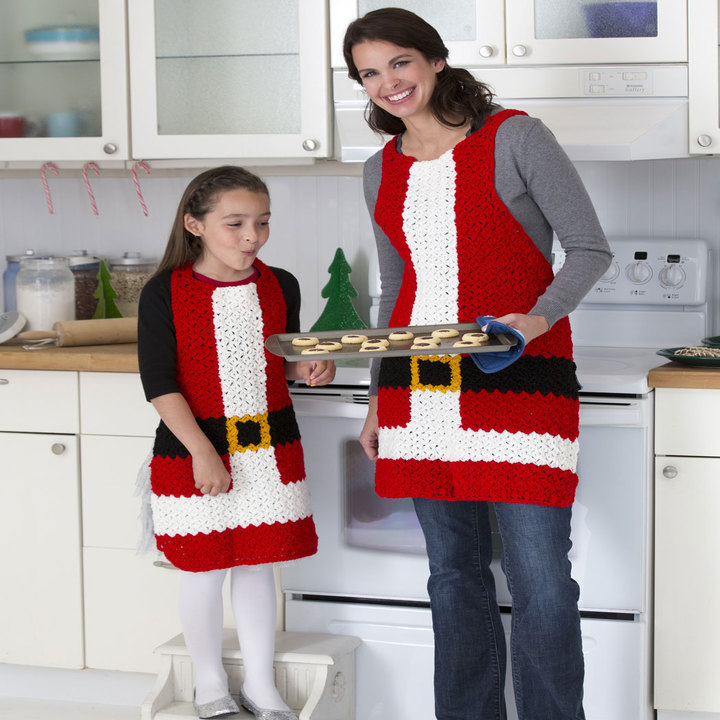
Santa’s Aprons
You and your best helper will whip up cookies for Santa in no time when you don this special holiday apparel! These crocheted aprons will add even more holiday cheer to your kitchen.
Pattern#: LW3191
Designed by: Urmie D. Seenarine
Project Type: Seasonal, Christmas
Skill Level: Intermediate
Required Supplies:
- RED HEART® Super Saver®: 2 skeins 319 Cherry Red A, 1 skein each 316 Soft White B, 312 Black C, and 321 Gold D
- Susan Bates® Crochet Hook: 5.5mm [US I-9]
- Stitch marker
- Yarn needle
GAUGE: 5 d-boxes = 4¾” (11 cm); 9 rows = 5″ (13 cm) over pattern. CHECK YOUR GAUGE. Use any size hook to obtain the gauge.
Directions are for children’s size. Changes for adult size are in parentheses.
Finished Width: 17 (24)” [43 (61) cm], at widest
Finished Total Length: 25½ (29)” [65 (73.5) cm], not including ties
Finished Width: 17 (24)” [43 (61) cm], at widest
Finished Total Length: 25½ (29)” [65 (73.5) cm], not including ties
Special Stitches
d-box (diagonal box) = (2 dc, ch 2, sc) in indicated stitch or space.
2-dc Cl (2 double crochet cluster) = Yarn over, insert hook in next stitch, yarn over and pull up loop, yarn over, draw through 2 loops, yarn over, insert hook in same stitch, yarn over and pull up loop, yarn over, draw through 2 loops, yarn over, draw through all 3 loops on hook.
Notes
1. Apron is worked from lower edge upwards. Color changes are used to create fur trim, belt, and buckle.
2. Before beginning, wind B into 2 separate balls, and C and D into 3 separate balls each.
3. To change color, work last stitch of old color to last yarn over. Yarn over with new color and draw through all loops on hook to complete stitch. Proceed with new color.
Fasten off old color.
APRON
With larger hook and A, ch 55 (76).
Row 1: (Dc, ch 2, sc) in 4th ch from hook (beginning ch counts as first dc – first d-box made), *skip next 2 ch, d-box in next ch; repeat from * across, turn—18 (25) d-boxes.
Rows 2–5: Ch 3, (dc, ch 2, sc) in first ch-2 space (first d-box made), d-box in each remaining ch-2 space across, turn; change to B in last st of Row 5.
Rows 6–11 (10): With B, repeat last row 6 (5) times; change to A in last st of last row
Note: In following rows use a separate ball of yarn for each section of color.
Row 12 (11)–16 (16): With A, ch 3, (dc, ch 2, sc) in first ch-2 space, d-box in next 6 (9) ch-2 spaces; change to B, d-box in next 4 (5) ch-2 spaces; change to A, d-box in last 7 (10) ch-2 spaces, turn; change to C in last st of last row.
Row 17: With C, ch 3, (dc, ch 2, sc) in first ch-2 space, d-box in next 6 (9) ch-2 spaces; change to D, d-box in next 4 (5) ch-2 spaces; change to C, d-box in last 7 (10) ch-2 spaces, turn.
Rows 18–20: With C, ch 3, (dc, ch 2, sc) in first ch-2 space, d-box in next 6 (9) ch-2 spaces; change to D, d-box in next ch-2 space; change to C, d-box in next 2 (3) ch-2 spaces; change to D, d-box in next ch-2 space; change to C, d-box in last 7 (10) ch-2 spaces, turn.
Row 21: Repeat Row 17; change to A in last st.
Rows 22–29 (33): With A, ch 3, (dc, ch 2, sc) in first ch-2 space, d-box in next 6 (9) ch-2 spaces; change to B, d-box in next 4 (5) ch-2 spaces; change to A, d-box in last 7 (10) ch-2 spaces, turn.
Place a stitch marker at beginning and end of last row, for placement of waist ties.
Shape Sides
Row 30 (34) (decrease): With A, slip st in each ch of first ch-2 space, slip st in next 2 dc, ch 3, (dc, ch 2, sc) in next ch-2 space, d-box in next 5 (8) ch-2 spaces, place a marker in last ch-2 space made; change to B, d-box in next 4 (5) ch-2 spaces, place a marker in last ch-2 space made; change to A, d-box in each ch-2 space across to last ch-2 space, 2-dc Cl in last ch-2 space, turn—16 (23) d-boxes.
Note: The markers added in Row 30 (34) indicate where the color change should occur. Move markers up to last ch-space of each color section, as each row is completed. Use of stitch markers in this manner is optional. If you can “read” your stitches, you may choose not to use markers.
Row 31 (35)–36 (46): With A, ch 3, (dc, ch 2, sc) in first ch-2 space, d-box in each ch-2 space to first marker; change to B, d-box in each ch-2 space to next marker; change to A, d-box in each ch-2 space across to last ch-2 space, 2-dc Cl in last ch-2 space, turn—10 (11) d-boxes.
Bib
Rows 37 (47)–46 (52): With A, ch 3, (dc, ch 2, sc) in first ch-2 space, d-box in next 2 ch-2 spaces; change to B, d-box in next 4 (5) ch-2 spaces; change to A, d-box in last 3 ch-2 spaces, turn.
Remove the color change markers.
Rows 37 (47)–46 (52): With A, ch 3, (dc, ch 2, sc) in first ch-2 space, d-box in next 2 ch-2 spaces; change to B, d-box in next 4 (5) ch-2 spaces; change to A, d-box in last 3 ch-2 spaces, turn.
Remove the color change markers.
First Neck Tie
Row 1: With A, ch 3 (counts as dc here and throughout), dc in first ch-2 space, dc in next dc, turn.
Row 2: Ch 3, dc in next 2 dc, turn.
Repeat Row 2 until tie measures about 9” (23cm).
Fasten off.
Row 1: With A, ch 3 (counts as dc here and throughout), dc in first ch-2 space, dc in next dc, turn.
Row 2: Ch 3, dc in next 2 dc, turn.
Repeat Row 2 until tie measures about 9” (23cm).
Fasten off.
Second Neck Tie
Row 1: Draw up a loop of A in opposite top corner of apron, ch 3, dc in next dc, dc in next ch-2 space, turn.
Row 2: Ch 3, dc in next 2 dc, turn.
Repeat Row 2 until tie measures about 9” (23cm).
Fasten off.
Row 1: Draw up a loop of A in opposite top corner of apron, ch 3, dc in next dc, dc in next ch-2 space, turn.
Row 2: Ch 3, dc in next 2 dc, turn.
Repeat Row 2 until tie measures about 9” (23cm).
Fasten off.
WAIST TIES
Row 1: Draw up a loop of A in edge of apron where marked to work down side of apron, ch 3 (counts as dc here and throughout), work 2 dc evenly spaced in edge of apron, turn—3 dc.
Row 2: Ch 3, dc in next 2 dc, turn.
Repeat Row 2 until tie measures about 15” (38 cm). Fasten off. Repeat on other side edge for 2nd tie.
FINISHING
Edging
Draw up a loop of A in edge of apron at beginning of an A-colored section, sc evenly spaced all the way around the outer edge of the apron, changing color to match each section; join with slip st in first sc. Fasten off.
Weave in ends.
Edging
Draw up a loop of A in edge of apron at beginning of an A-colored section, sc evenly spaced all the way around the outer edge of the apron, changing color to match each section; join with slip st in first sc. Fasten off.
Weave in ends.
ABBREVIATIONS: A, B, C, and D = Color A, B, C, and D; ch = chain; dc = double crochet; sc = single crochet; st(s) = stitch (es); () = work directions in parentheses into same st; * = repeat whatever follows the * as indicated.
Be sure to…
Visit my Website
Join me on Facebook
Subscribe to the Maggie Weldon YouTube Channel for more crochet lesson videos
Subscribe to Maggie’s Crochet YouTube Channel for product reviews
Sign Up for My Newsletter
Follow us on Pinterest
Follow us on Twitter

No Comments