From RedHeart.com
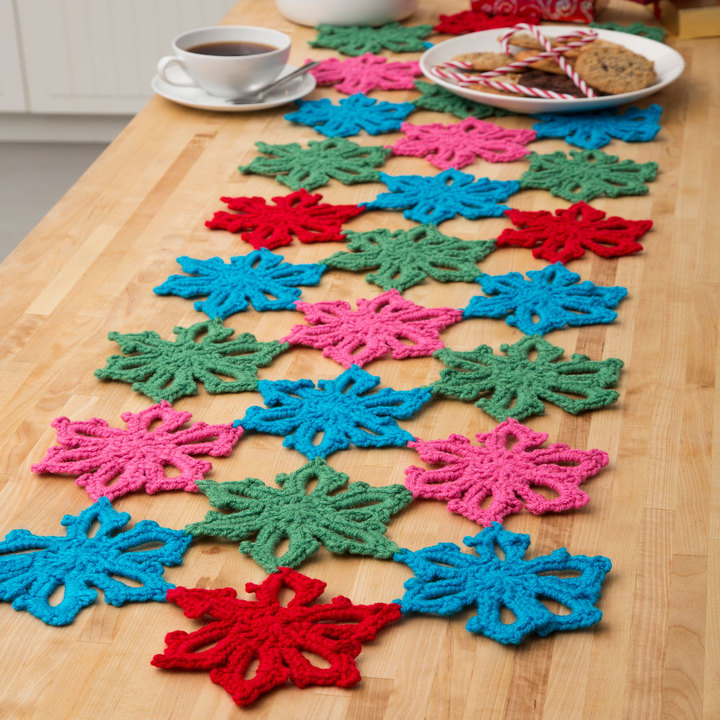
Snowflake Table Runner
LW4419
Designed by: Nancy Anderson
Project Type: Seasonal, Home Decor, Christms
Required Supplies:
- RED HEART® With Love®: 1 skein each 1803 Blue Hawaii A, 1621 Evergreen B, 1704 Bubblegum C, and 1909 Holly Berry D or Holiday colors of choice
- Susan Bates® Crochet Hook: 5.5mm [US I-9]
- Yarn needle
GAUGE: 1 motif = 6” (15 cm) from point to point, stretched. Gauge is not critical for this project but keep tension tight.
Whether you choose a selection of bright colors, soft colors or an elegant shade of white, this table runner will add a happy note to your décor. You’ll love using it on a dining table, or adjust the size to fit any table.
Runner measures 15” wide x 60” long (38 x 152.5 cm).
Special Stitch
Picot = ch 4, slip st in last sc made.
Picot = ch 4, slip st in last sc made.
Special Technique
Adjustable-ring method = Wrap yarn into a ring, ensuring that the tail falls behind the working yarn. Grip ring and tail firmly between middle finger and thumb. Insert hook through center of ring, yarn over (with working yarn) and draw up a loop. Work stitches of first round in the ring, working over both strands (the tail and the ring). After the first round of stitches is worked, pull gently, but firmly, on tail to tighten ring.
Adjustable-ring method = Wrap yarn into a ring, ensuring that the tail falls behind the working yarn. Grip ring and tail firmly between middle finger and thumb. Insert hook through center of ring, yarn over (with working yarn) and draw up a loop. Work stitches of first round in the ring, working over both strands (the tail and the ring). After the first round of stitches is worked, pull gently, but firmly, on tail to tighten ring.
Notes
1. Runner is made from 28 snowflake motifs arranged into 3 rows of 9, 10, and 9 motifs each.
2. Each motif is worked in joined rounds with right side facing at all times.
3. Motifs are sewn to neighboring motifs through center picots in the last rounds. Hold the motifs with wrong sides together as you sew through ch-4 spaces.
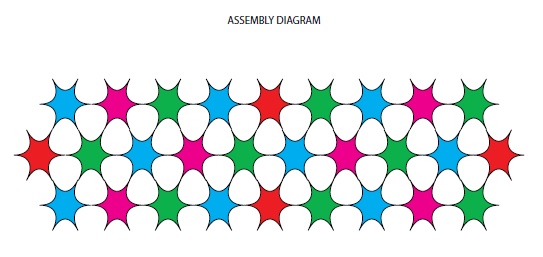
4. Make and join motifs to neighboring motifs according to Assembly Diagram and instructions.
1. Runner is made from 28 snowflake motifs arranged into 3 rows of 9, 10, and 9 motifs each.
2. Each motif is worked in joined rounds with right side facing at all times.
3. Motifs are sewn to neighboring motifs through center picots in the last rounds. Hold the motifs with wrong sides together as you sew through ch-4 spaces.
4. Make and join motifs to neighboring motifs according to Assembly Diagram and instructions.
RUNNER
Motif (make 28 – 9 with A, 9 with B, 6 with C, and 4 with D)
Make an adjustable ring.
Round 1 (right side): Ch 4 (counts as first dc, ch 1), dc in ring, *(ch 1, dc) in ring; repeat from * 9 times, ch 1; join with slip st in 3rd ch of beginning ch¬—12 dc and 12 ch-1 spaces. Pull gently, but firmly, on tail to tighten ring.
Round 2: Slip st in first ch-1 space, sc in same space, ch 8, sc in next ch-1 space, sc in next dc, *sc in next ch-1 space, ch 8, sc in next ch-1 space, sc in next dc; repeat from * 4 times; join with slip st in first sc—18 sc and 6 ch-8 spaces.
Round 3: Work ([4 sc, picot] 3 times, 4 sc) in first ch-8 space (spoke made), skip next sc, slip st in next 2 sc, *([4 sc, picot] 3 times, 4 sc) in next ch-8 space, skip next sc, slip st in next 2 sc; repeat from * 4 times; join with slip st in first sc—6 spokes. Fasten off.
Round 3: Work ([4 sc, picot] 3 times, 4 sc) in first ch-8 space (spoke made), skip next sc, slip st in next 2 sc, *([4 sc, picot] 3 times, 4 sc) in next ch-8 space, skip next sc, slip st in next 2 sc; repeat from * 4 times; join with slip st in first sc—6 spokes. Fasten off.
FINISHING
With right sides facing, arrange motifs as shown in the assembly diagram. With wrong sides of neighboring spokes held together and matching center picots, sew through ch-4 spaces of center picots to join, matching yarn to one or the other color. Weave in ends.
Wet block runner by stretching spokes of each motif evenly, pin in place, and spray with water. Allow to dry thoroughly before handling.
ABBREVIATIONS
A, B, C = Color A, Color B, Color C, etc.; ch = chain; dc = double crochet; sc = single crochet; st(s) = stitch(es); ( ) = work directions in parentheses into same st; [ ] = work directions in brackets the number of times specified; * = repeat whatever follows the * as indicated.
Be sure to…
Visit my Website
Join me on Facebook
Subscribe to the Maggie Weldon YouTube Channel for more crochet lesson videos
Subscribe to Maggie’s Crochet YouTube Channel for product reviews
Sign Up for My Newsletter
Follow us on Pinterest
Follow us on Twitter

No Comments