
From www.RedHeart.com
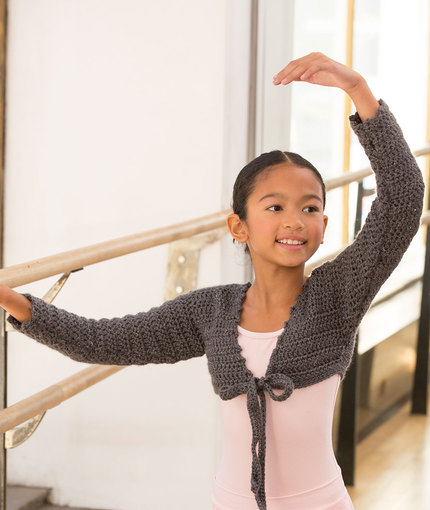
At the Barre Shrug Free Crochet Pattern
Pattern Number: LW5061
Designed By: Diane Moyer
Skill Level: Easy
Required Supplies:
RED HEART® Sparkle Soft™: 2 (3, 3, 4) balls 9404 Charcoal
Susan Bates® Crochet Hook: 5.5mm [US I-9]
Stitch markers
Row counter (optional)
Yarn needle
So perfect for budding ballerinas to wear at the dance studio, this comfortable tie-front shrug pattern is sized from 4 to 10. The soft yarn has a bit of sparkle that allows a girl to shine whether wearing a leotard, skirt or jeans.
Gauge/Tension: GAUGE: 12 sts = 4” [10 cm]; 8 rows = 4” [10 cm] in double crochet. CHECK YOUR GAUGE. Use any size hook to obtain the gauge.
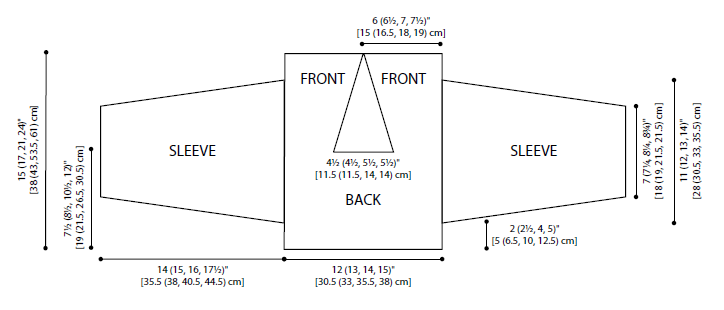
Directions are for size Child 4. Changes for sizes Child 6, 8, and 10 are in parentheses.
Finished Chest: 24 (26, 28, 30)” [61 (66, 71, 76) cm]
Finished Length: 8 (9, 11, 12½)” [20.5 (23, 28, 32) cm]
Special Stitches
dc2tog (double crochet 2 stitches together) = [Yarn over, insert hook in next stitch, yarn over and pull up loop, yarn over, draw through 2 loops] 2 times, yarn over, draw through all 3 loops on hook.
Fdc (foundation double crochet – This technique creates a foundation chain and a row of double crochet stitches in one) = First st: Place a slip knot on hook, ch 3, yarn over, insert hook in 3rd ch from hook and draw up a loop, yarn over, draw through 1 loop on hook (the “chain”), [yarn over and draw through 2 loops on hook] twice (the “double crochet”).
Remaining sts: *Yarn over, insert hook in “chain” of previous stitch and draw up a loop, yarn over, draw through 1 loop
on hook (the “chain”), [yarn over and draw through 2 loops on hook] twice (the “double crochet”); repeat from * for desired number of stitches.
Fsc (foundation single crochet – This technique creates a foundation chain and a row of single crochet stitches in one) = First st: Place a slip knot on hook, ch 2, insert hook in 2nd ch from hook and draw up a loop, yarn over, draw through 1 loop on hook (the “chain”), yarn over and draw through both loops on hook (the “single crochet”).
Remaining sts: *Insert hook in “chain” of previous stitch and draw up a loop, yarn over, draw through 1 loop on hook (the
“chain”), yarn over and draw through both loops on hook (the “single crochet”); repeat from * for desired number of
stitches.
Notes
1. Body of shrug is worked in one piece, beginning at the lower back edge.
2. Sleeves are worked directly onto the body.
3. Using a row counter is helpful to ensure that both fronts and back have the same number of rows, that both sleeves have
the same number of rows, and to keep track of front and sleeve increases and decreases.
SHRUG
Back
Fdc 36 (40, 42, 44).
Row 1: Ch 1 (does not count as a st here and throughout), turn, dc in each st across.
Repeat Row 1 until piece measures about 7½ (8½, 10½, 12)” [19 (21.5, 26.5, 30.5) cm] from beginning.
Shape First Front
Row 1: Ch 1, turn, dc in first 11 (13, 13, 14) sts; leave remaining sts unworked for neck and second front.
Size 4 ONLY
Row 2 (increase row): Ch 1, turn, 2 dc in first st (increase made), dc in each st across—12 dc.
Row 3: Ch 1, turn, dc in each st across.
Rows 4-15: Repeat Rows 2 and 3 six more times—18 dc.
Repeat Row 3 until shoulder measures 7½ (8½, 10½, 12)” [19 (21.5, 26.5, 30.5) cm] (same as back). Fasten off.
Size 6 ONLY
Row 2 (increase row): Ch 1, turn, 2 dc in first st (increase made), dc in each st across—14 dc.
Row 3: Ch 1, turn, dc in each st across.
Rows 4–9: Repeat Rows 2 and 3 three more times—17 dc.
Row 10: Repeat Row 3.
Row 11 (increase row): Ch 1, turn, dc in each st to last st, 2 dc in last st—18 dc.
Rows 12 and 13: Repeat Row 3 twice.
Row 14 (increase row): Repeat Row 2—19 dc.
Rows 15 and 16: Repeat Row 3 twice.
Row 17 (increase row): Repeat Row 11—20 dc.
Repeat Row 3 until shoulder measures 7½ (8½, 10½, 12)” [19 (21.5, 26.5, 30.5) cm] (same as back). Fasten off.
Size 8 ONLY
Row 2 (increase row): Ch 1, turn, 2 dc in first st (increase made), dc in each st across—14 dc.
Row 3: Ch 1, turn, dc in each st across.
Rows 4–7: Repeat Rows 2 and 3 two more times—16 dc.
Row 8: Repeat Row 3.
Row 9 (increase row): Ch 1, turn, dc in each st to last st, 2 dc in last st—17 dc.
Rows 10 and 11: Repeat Row 3 twice.
Row 12 (increase row): Repeat Row 2—18 dc.
Rows 13 and 14: Repeat Row 3 twice.
Row 15 (increase row): Repeat Row 9—19 dc.
Repeat Rows 10–15 once more—21 dc.
Repeat Row 3 until shoulder measures 7½ (8½, 10½, 12)” [19 (21.5, 26.5, 30.5) cm] (same as back). Fasten off.
Size 10 ONLY
Row 2 (increase row): Ch 1, turn, 2 dc in first st (increase made), dc in each st across—15 dc.
Rows 3 and 4: Ch 1, turn, dc in each st across.
Row 5 (increase row): Ch 1, turn, dc in each st to last st, 2 dc in last st—16 dc.
Rows 6 and 7: Repeat Rows 3 and 4.
Row 8 (increase row): Ch 1, turn, 2 dc in first st, dc in each st across—17 dc.
Repeat Rows 3–8 two more times—21 dc.
Repeat Rows 3–5—22 dc.
Repeat Row 3 until shoulder measures 7½ (8½, 10½, 12)” [19 (21.5, 26.5, 30.5) cm] (same as back). Fasten off.
SHAPE SECOND FRONT
Skip next 14 (14, 16, 16) unworked sts (for neck) on last row of back following first front, join yarn with slip st in next st.
Row 1: Ch 1, dc in same st as joining, dc in remaining 10 (12, 12, 13) unworked sts—11 (13, 13, 14) sts.
Size 4 ONLY
Row 2 (increase row): Ch 1, turn, dc in each st to last st, 2 dc in last st (increase made)—12 dc.
Row 3: Ch 1, turn, dc in each st across.
Rows 4-15: Repeat Rows 2 and 3 six more times—18 dc.
Repeat Row 3 until shoulder measures 7½ (8½, 10½, 12)” [19 (21.5, 26.5, 30.5) cm] (same as back). Fasten off.
Size 6 ONLY
Row 2 (increase row): Ch 1, turn, dc in each st to last st, 2 dc in last st (increase made)—14 dc.
Row 3: Ch 1, turn, dc in each st across.
Rows 4–9: Repeat Rows 2 and 3 three more times—17 dc.
Row 10: Repeat Row 3.
Row 11 (increase row): Ch 1, turn, 2 dc in first st, dc in each st across—18 dc.
Rows 12 and 13: Repeat Row 3 twice.
Row 14 (increase row): Repeat Row 2—19 dc.
Rows 15 and 16: Repeat Row 3 twice.
Row 17 (increase row): Repeat Row 11—20 dc.
Repeat Row 3 until shoulder measures 7½ (8½, 10½, 12)” [19 (21.5, 26.5, 30.5) cm] (same as back). Fasten off.
Size 8 ONLY
Row 2 (increase row): Ch 1, turn, dc in each st to last st, 2 dc in last st (increase made)—14 dc.
Row 3: Ch 1, turn, dc in each st across.
Rows 4–7: Repeat Rows 2 and 3 two more times—16 dc.
Row 8: Repeat Row 3.
Row 9 (increase row): Ch 1, turn, 2 dc in first st, dc in each st across—17 dc.
Rows 10 and 11: Repeat Row 3 twice.
Row 12 (increase row): Repeat Row 2—18 dc.
Rows 13 and 14: Repeat Row 3 twice.
Row 15 (increase row): Repeat Row 9—19 dc.
Repeat Rows 10–15 once more—21 dc.
Repeat Row 3 until shoulder measures 7½ (8½, 10½, 12)” [19 (21.5, 26.5, 30.5) cm] (same as back). Fasten off.
Size 10 ONLY
Row 2 (increase row): Ch 1, turn, dc in each st to last st, 2 dc in last st (increase made)—15 dc.
Rows 3 and 4: Ch 1, turn, dc in each st across.
Row 5 (increase row): Ch 1, turn, 2 dc in first st, dc in each st across—16 dc.
Rows 6 and 7: Repeat Row 3 twice.
Row 8 (increase row): Ch 1, turn, dc in each st to last st, 2 dc in last st—17 dc.
Repeat Rows 3–8 two more times—21 dc.
Repeat Rows 3–5—22 dc.
Repeat Row 3 until shoulder measures 7½ (8½, 10½, 12)” [19 (21.5, 26.5, 30.5) cm] (same as back). Fasten off.
SLEEVES (work 2)
The pattern stitch is reversible, so there is no specific right side. Before working the sleeves, select the side you like best to be
the right side.
With right side facing, place markers on both side edges of front and back, about 2 (2½, 4, 5)” [5 (6.5, 10, 12.5) cm] above lower
edge (leaving about 5½ (6, 6½, 7)” [14 (15, 16.5, 18) cm] between the markers).
Working across one side edge, join yarn with slip st at first marker.
Row 1 (right side): Ch 1, dc in same space as joining, work 32 (35, 38, 41) more dc evenly spaced across edge to second
marker—33 (36, 39, 42) dc.
Rows 2–3: Ch 1, turn, dc in each st across.
Row 4 (decrease row): Ch 1, turn, dc2tog, dc in each st to last 2 sts, dc2tog—31 (34, 37, 40) dc.
Rows 5–7: Ch 1, turn, dc in each st across.
Row 8 (decrease row): Repeat Row 4—29 (32, 35, 38) dc.
Repeat last 4 rows 4 (5, 5, 6) more times—21 (22, 25, 26) sts.
Repeat Row 5 until piece measures about 14 (15, 16, 17½)” [35.5 (38, 40.5, 44.5) cm] from beginning, ending with a wrong side row as the last row you work.
Picot Edging (right side): Ch 1, slip st in first st, (slip st, ch 3, slip st) in next st (picot made), *slip st in next 2 sts, (slip st, ch 3, slip st) in next st; repeat from * to last 1 (2, 2, 3) sts, slip st in each st to end of row. Fasten off. Repeat across other side edge to work second sleeve.
FINISHING
Sew side and sleeve seams, leaving a ¾-1” [19-25mm] opening 1” [2.5cm] from the sleeve picot edging for thumb opening.
Front Picot Edging
With right side facing, join yarn with slip st in lower right corner, working in ends of rows work evenly spaced up right front edge, across back neck edge, and down left front edge, as follows:
Picot Edging (right side): Ch 1, slip st in next st, *(slip st, ch 3, slip st) in next st (picot made), slip st in next 2 sts; repeat from * across taking care to work at least one slip st at the end (do not end with a picot). Fasten off.
Ties and Lower Edging
Row 1: Fsc 54 (60, 63, 66) for first tie, with right side of shrug facing, sc in each st across lower edge of left front; sc in each
st across lower edge of back; sc in each st across lower edge right front; insert hook in base of last sc just made and draw up a
loop, yarn over and draw through one loop on hook (the “chain”), yarn over and draw through both loops on hook (the “single
crochet” – first Fsc made), work 53 (59, 62, 65) more Fsc.
Rows 2 and 3: Ch 1, turn, sc in each st across.
Fasten off.
Weave in ends.
ABBREVIATIONS
ch = chain;
dc = double crochet;
sc = single crochet;
st(s) = stitch(es);
() = work directions in parentheses into same st;
[ ] = work directions in brackets the number of times specified;
* = repeat whatever follows the * as indicated.
No Comments