From www.redheart.com
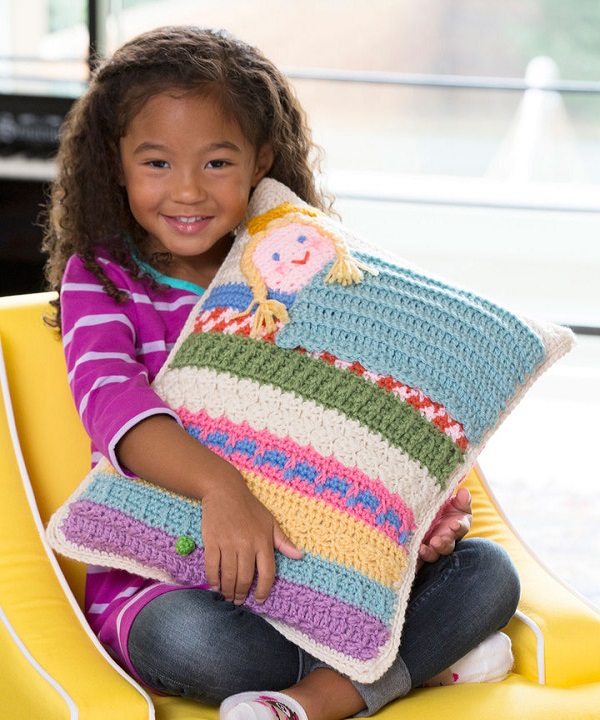
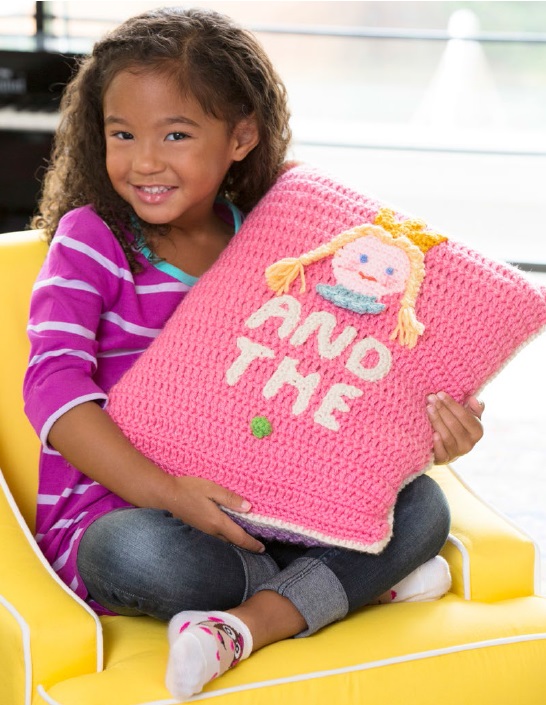
Princess & the Pea Pillow
Crochet a pillow that will be loved by the special little princess in your life! Based on the classic Princess and the Pea fairy tale, it features the princess happily sleeping on piles of mattresses on the front with the story name depicted on the back.
Pattern #: LW4562
Designed by Michele Wilcox
Project Type: Home Decor, Toy, Kid, Pillow
Skill Level: Intermediate
Required Supplies:
- RED HEART® Super Saver®: 1 skein each of 530 Orchid A, 347 Light Periwinkle B, 320 Cornmeal C, 706 Perfect Pink D, 885 Delft Blue E, 313 Aran F, 624Tea Leaf G, 726 Coral H, 724 Baby Pink I, 672 Spring Green J, 321 Gold K, and 235 Lemon L
- Susan Bates® Crochet Hook: 4 mm [US G-6]
- Yarn needle
Additional Supplies Needed:
12 x 16” (30.5 x 40.5 cm) pillow form, red crayon (for cheeks)
Pillow measures 12 x 16” (30.5 x 40.5 cm).
Special Stitches
Bpdc (back post double crochet) = Yarn over, insert hook from back side of work to front and to back again around the post of indicated stitch; yarn over and pull up a loop (3 loops on hook), yarn over and draw through 2 loops (2 loops on hook), yarn over and draw through 2 loops (1 loop on hook). Skip the stitch “in front of” the Bpdc.
Fpdc (Front post double crochet) = Yarn over, insert hook from front side of work to back and to front again around post of indicated stitch; yarn over and pull up a loop (3 loops on hook), yarn over and draw through 2 loops (2 loops on hook), yarn over and draw through 2 loops (1 loop remains on hook). Skip the stitch in the current row “behind” the Fpdc.
Fpsc (front post single crochet) = Insert hook from front to back and to front again around post of indicated stitch, yarn over and draw up a loop, yarn over and draw through 2 loops on your hook. Skip the stitch in the current row “behind” the Fpsc.
sc2tog = [Draw up a loop in next st] twice, yarn over and draw through all 3 loops on hook.
NOTES
1. Pillow is made from two pieces, front and back. Separate pieces are made and sewn to the front and back for the blanket, princess, and letters.
2. To change color, work last stitch of old color to last yarn over. Yarn over with new color and draw through all loops on hook to complete stitch. Proceed with new color. Fasten off old color.
FRONT
First Mattress
Beginning at lower edge with A, ch 44.
Row 1 (right side): Sc in 2nd ch from hook and in each remaining ch across, turn—43 sc.
Row 2: Ch 1, skip first st, (slip st, dc) in next st, *skip next st, (slip st, dc) in next st; repeat from * to last st, skip last st, sc in turning ch, turn—43 sts.
Row 3: Ch 3 (counts as first dc here and throughout), dc in each st across working last dc in top of turning ch, turn.
Row 4: Ch 1, skip first st, (slip st, dc) in next st, *skip next st, (slip st, dc) in next st; repeat from * to last 2 sts, skip next st, sc in turning ch, turn—43 sts.
Row 5: Ch 1, sc in each st across and change to B in last st, turn—43 sc.
Second Mattress
Rows 1–3: Ch 1, sc in each st across, turn.
Row 4 (right side): Ch 1, *sc in next 2 sts, Fpdc around sc 2 rows below (in Row 2); repeat from * to last st, sc in last st, turn.
Row 5: Ch 1, sc in each st across and change to C in last st, turn.
Third Mattress
Row 1 (right side): Ch 3, dc in each st across, turn.
Row 2: Ch 1, 2 dc in first st, *skip next 2 sts, (sc, 2 dc) in next st; repeat from * to last 2 sts, skip next st, sc in top of turning ch, turn.
Row 3: Ch 3, turn, dc in each st across, turn.
Row 4: Ch 1, sc in each st across and change to D in last st, turn.
Fourth Mattress
Rows 1 and 2: Sc in each st across and change to E in last st of Row 2, turn.
Row 3 (right side): Ch 1, sc in first st, *Fpsc around next st 2 rows below (in Row 1), sc in next 3 sts; repeat from * to last 2 sts, Fpsc around next st 2 rows below, sc in last st, turn.
Row 4: Ch 1, sc in each st across and change to D in last st, turn.
Row 5: Ch 1, sc in first st, *Fpsc around next Fpsc of Row 3, sc in next 3 sts; repeat from * to last 2 sts, Fpsc around next Fpsc of Row 3, sc in last st, turn.
Row 6: Ch 1, sc in each st across and change to F in last st, turn.
Fifth Mattress
Rows 1–4: Ch 1, (hdc, dc) in first st, *(skip next 2 sts, (sc, hdc, dc) in next st; repeat from * to last 2 sts, skip last 2 sts, sc in turning ch and change to G in last st of Row 4, turn.
Sixth Mattress
Row 1 (right side): Ch 3, sc in next dc, hdc in next hdc, *dc in next sc, sc in next dc, hdc in next hdc; repeat from * across, turn.
Row 2: Ch 3, dc in each st across, turn.
Row 3: Ch 3, *Fpdc around next st, Bpdc around next st; repeat from * to last 2 sts, Fpdc around next st, dc in top of turning ch, turn.
Row 4: Ch 3, *Bpdc around next st, Fpdc around next st; repeat from * to last 2 sts, Bpdc around next st, dc in top of turning ch and change to H in last st, turn.
Seventh Mattress
Note: When changing color in this section, carry color not in use across wrong side of piece until next needed.
Row 1 (right side): With H, ch 1, sc in first 2 sts, [change to I, sc in next 2 sts; change to H, sc in next 2 sts] 10 times; change to I, sc in last st, turn.
Row 2: With I, ch 1, sc in first st, [change to H, sc in next 2 sts; change to I, sc in next 2 sts] 10 times; change to H, sc in last 2 sts and change to I in last st, turn.
Row 3: With I, ch 1, sc in first 2 sts, [change to H, sc in next 2 sts; change to I, sc in next 2 sts] 10 times; change to H, sc in last st, turn.
Row 4: With H, ch 1, sc in first st, [change to I, sc in next 2 sts; change to H, sc in next 2 sts] 10 times; change to I, sc in last 2 sts and change to E in last st, turn. Fasten off H and I.
Eighth Mattress
Rows 1-4: Ch 1, sc in each st across and change to F in last st of Row 4, turn.
Background above Bed
Row 1 (right side): Ch 3, dc in each st across, turn.
Row 2: Ch 1, sc in each st across, turn.
Rows 3–12: Repeat Rows 1 and 2 five more times.
Edging Round (right side): Ch 1, sc evenly spaced around entire outer edge of front, working 3 sc in each corner; join with slip st in first sc. Fasten off.
BACK
With D, ch 44.
Row 1 (wrong side): Sc in 2nd ch from hook and in each remaining ch across, turn—43 sc.
Row 2: Ch 3 (counts as dc), dc in each st across, turn.
Row 3: Ch 1, sc in each st across, turn.
Rows 4–39: Repeat Rows 2 and 3 eighteen more times.
Edging (right side): Ch 1, work sc evenly spaced around entire outer edge of back, working 3 sc in each corner; join with slip st in first sc. Fasten off.
BLANKET
With B, ch 31.
Row 1 (right side): Sc in 2nd ch from hook and in each remaining ch across, turn—30 sc.
Row 2: Ch 3, working in back loops only, dc in each st across, turn.
Row 3: Ch 1, sc in each st across, turn.
Rows 4–12: Repeat Rows 2 and 3 four more times, then repeat Row 2 once more.
Row 13: Ch 1, *3 hdc in next st, skip next st, slip st in next st, skip next st; repeat from * to last 2 sts, 3 hdc in next st, slip st in last st. Fasten off, leaving a long tail for sewing.
PRINCESS HEAD (make 2)
With I, ch 6.
Row 1: Sc in 2nd ch rom hook and in each remaining ch across, turn—5 sc.
Row 2: Ch 1, 2 sc in first st, sc in next 3 sts, 2 sc in last st, turn—7 sc.
Row 3: Ch 1, 2 sc in first st, sc in next 5 sts, 2 sc in last st, turn—9 sc.
Row 4: Ch 1, sc in each st across, turn.
Row 5: Ch 1, 2 sc in first st, sc in next 7 sts, 2 sc in last st, turn—11 sc.
Rows 6–10: Ch 1, sc in each st across, turn.
Rows 11 and 12: Ch 1, sc2tog, sc to last 2 sts, sc2tog, turn—7 sc at the end of Row 12. Fasten off.
Embroider Facial Features:
With E, embroider French knot eyes on to face. With H, embroider couched stitch mouth below eyes. Rub red crayon lightly onto face for checks.
PEA (make 2)
With J, ch 2.
Round 1: Work 6 sc in 2nd ch from hook; do not join, work in continuous rounds (spiral).
Round 2: Sc in next 6 sts; slip st in next st. Fasten off, leaving a long tail. Weave the tail through the sts of the last round and pull to gather and shape piece into a ball.
CROWN (make 2)
With K, ch 10.
Row 1 (right side): Sc in 2nd ch from hook and in each remaining ch across, turn—9 sc.
Rows 2 and 3: Ch 1, sc in each st across, turn.
Row 4: Ch 5, sc in 2nd ch from hook, hdc in next ch, dc in next 2 ch, skip next 2 sts of Row 3, slip st in next st, ch 7, slip st in 2nd ch from hook, sc in next ch, hdc in next ch, dc in next 3 ch, skip next 3 sts of Row 3, slip st in next st, ch 5, sc in 2nd ch from hook, hdc in next ch, dc in next 2 ch, skip next st of Row 3, slip st in last st.
Fasten off, leaving a long tail for sewing.
COLLAR
With B, ch 8.
Row 1: Sc in 2nd ch from hook and in each remaining ch across, turn—7 sc.
Row 2: Ch 1, sc in each st across, turn.
Row 3: Ch 1, 3 hdc in first st, [slip st in next st, 3 hdc in next st] 3 times. Fasten off, leaving a long tail for sewing.
LETTER “A”
With F, ch 8.
Row 1: Sc in 2nd ch from hook and in next 3 ch, ch 3, sc in 2nd ch from hook and in next ch for center bar, sc in next 3 ch of ch-8, turn, ch 3, slip st in tip of center bar, ch 5, turn, sc in 2nd ch from hook and next 3 ch, sc in slip st, sc in last 3 ch, slip st in top of “A” Fasten off, leaving a long tail for sewing.
LETTER “N”
With F, ch 25.
Row 1: Sc in 2nd ch from hook and in next 6 ch, skip next ch, sc in next 8 ch, 3 sc in next ch, sc in last 7 ch. Fasten off, leaving a long tail for sewing.
LETTER “D”
With F, ch 17.
Row 1: Sc in 2nd ch from hook and in next 6 ch, 3 sc in next ch, sc in next 7 ch, 2 sc in last ch; join with slip st in first sc. Fasten off, leaving a long tail for sewing.
LETTER “T”
With F, ch 8.
Row 1: Sc in 2nd ch from hook and in each remaining ch across, ch 3, sc in 2nd ch from hook and in next ch, sc in top of “T”, ch 3, turn, sc in 2nd ch from hook and next ch, slip st in top of “T”. Fasten off, leaving a long tail for sewing.
LETTER “H”
First Half: With F, ch 8. Sc in 2nd ch from hook and in next 3 ch, ch 3, sc in 2nd ch from hook and in next ch for center bar, sc in next 3 ch of ch-8. Fasten off, leaving a long tail for sewing.
Second Half: With F, ch 8. Sc in 2nd ch from hook and in each remaining ch across. Fasten off, leaving a long tail for sewing. Sew first and second halves together at tip of center bar.
LETTER “E”
With F, ch 8.
Row 1: Slip st in 2nd ch from hook, [ch 3, sc in 2nd ch from hook and in next ch, sc in next 3 ch of ch-8] twice, ch 3, sc in 2nd ch from hook and in next ch, slip st in corner of “E”. Fasten off, leaving a long tail for sewing.
BRAIDS (make 2)
Cut 13 lengths of L, each about 23” (58.5 cm). Cut another 2 pieces of L, about 10” (25.5 cm) long. Hold 12 lengths together and tie the 13th tightly around center. Do not trim center tie, use it later for sewing braids to head.
Divide the 12 lengths on one side of tie into 3 groups of 4 strands each and braid for 3–4” (7.5–10 cm), tie one of the shorter pieces of L around end of braid to secure. Repeat to braid lengths on either side of tie.
FINISHING
Assemble Front
Using photograph as a guide and using long tails for sewing, sew princess head and blanket near top of front. Sew braid to top of head. Sew crown above braid. Sew a pea between two bottom mattresses.
Assemble Back
Using photograph as a guide and using long tails for sewing, sew princess head, braids, crown and collar in place on back. Sew letters in place below princess. Sew a pea below the letters.
Assemble Pillow
Hold front and back with wrong sides together. Working from right side and through both thicknesses, join F with sc in any corner, work sc evenly spaced across 3 sides, working 3 sc in each corner, insert pillow form and work sc across fourth edge. Fasten off. Weave in ends.
ABBREVIATIONS
A, B, C, etc. = Color A, Color B, Color C etc.; ch = chain; dc = double crochet; hdc = half double crochet; sc = single crochet; st(s) = stitch (es); ( ) = work directions in parentheses into same st; [ ] = work directions in brackets the number of times specified; * = repeat whatever follows the * as indicated.

No Comments