From www.redheart.com
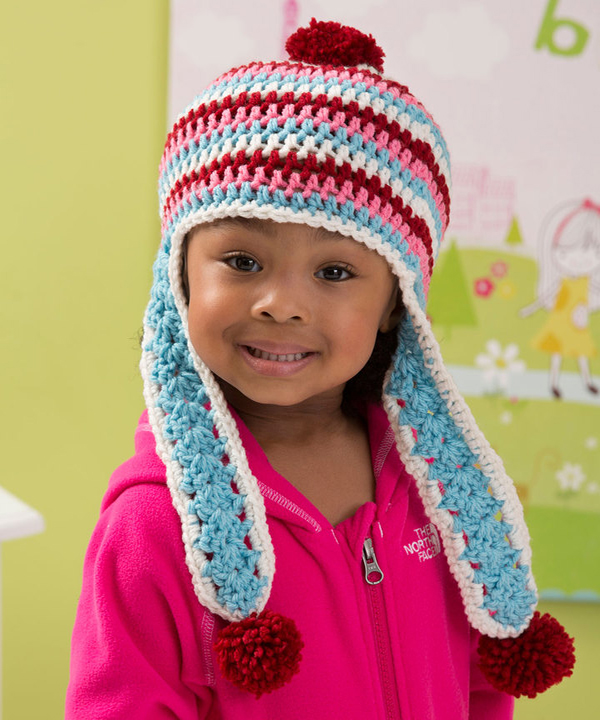
Snowy Day Earflap Hat
This darling hat is perfect for keeping warm in the winter! Includes five sizes so you can crochet it to fit any child perfectly.
Pattern #: LW4341
Designed by: Salena Baca
Project Type: Hats, Kids
Skill Level: Easy
Required Supplies:
- RED HEART® With Love®: 1 skein each 1101 Eggshell A, 1914 Berry Red B, 1704 Bubblegum C, and 1502 Iced Aqua D
- Susan Bates® Crochet Hook: 5.5mm [US I-9]
- Yarn needle
- Stitch marker
- Pompom maker or 2” (5 cm) piece of heavy cardboard
GAUGE: 13 sts = 4” (10 cm); 7 rounds = 3” (7.5 cm) in half double crochet. CHECK YOUR GAUGE. Use any size hook to obtain the gauge.
Directions are for size X-Small. Changes for sizes Small, Medium, Large, and X-Large are in parentheses.
Hat measures 14 (15½, 17, 18½, 20)” [35.5 (39.5, 43, 47, 51) cm] circumference at brim.
Hat measures 14 (15½, 17, 18½, 20)” [35.5 (39.5, 43, 47, 51) cm] circumference at brim.
Special Technique
Adjustable-ring method = Wrap yarn in a ring, ensuring that the tail falls behind the working yarn. Grip ring and tail firmly between middle finger and thumb. Insert hook through center of ring, yarn over (with working yarn) and draw up a loop. Work stitches of first round in the ring, working over both strands (the tail and the ring). After the first round of stitches is worked, pull gently, but firmly, on tail to tighten ring.
Join with sc = Place a slip knot on hook, insert hook in indicated stitch, yarn over and draw up a loop, yarn over and draw through both loops on hook.
Color Sequence
At the end of each round, change color as in the following sequence: Work 1 round with A, 1 round with B, 1 round with C, 1 round with D.
At the end of each round, change color as in the following sequence: Work 1 round with A, 1 round with B, 1 round with C, 1 round with D.
Notes
1. Hat is made in joined rounds with earflaps worked back and forth in rows.
2. Chain 1 at the beginning of a round or row does not count as a stitch.
3. In rounds only, change color in each size according to color sequence until otherwise instructed.
4. To change color, work last stitch of old color to last yarn over. Yarn over with new color and draw through all loops on hook to complete stitch. Proceed with new color. Cut old color.
HAT
With A, make an adjustable ring, ch 1.
Round 1 (right side): Work 10 hdc in ring; change to B; join with slip st in first st—10 hdc. Pull gently, but firmly, on tail to tighten ring.
Round 2: Ch 1, 2 hdc in each st around; change to C; join with slip st in first st—20 hdc.
Round 3: Ch 1, hdc in first st, 2 hdc in next st, [hdc in next st, 2 hdc in next st] 9 times; change to D; join with slip st in first st—30 hdc.
Round 4: Ch 1, hdc in first 2 sts, 2 hdc in next st, [hdc in next 2 sts, 2 hdc in next st] 9 times; change to A; join with slip st in first st—40 hdc.
Round 5: Ch 1, hdc in first 7 (3, 3, 3, 3) sts, 2 hdc in next st, [hdc in next 7 (3, 3, 3, 3) sts, 2 hdc in next st] 4 (9, 9, 9, 9) times; change to B; join with slip st in first st—45 (50, 50, 50, 50) hdc.
Continue changing colors as in color sequence until otherwise instructed.
Sizes X-Small and Small only:
Rounds 6–13 (14): Ch 1, hdc in each st around; change to D at end of last round; join with slip st in first st.
Do not fasten off.
Rounds 6–13 (14): Ch 1, hdc in each st around; change to D at end of last round; join with slip st in first st.
Do not fasten off.
Size Medium only:
Round 6: Ch 1, hdc in first 9 sts, 2 hdc in next st, [hdc in next 9 sts, 2 hdc in next st] 4 times; join with slip st in first st—55 hdc.
Rounds 7–15: Ch 1, hdc in each st around; join with slip st in first st.
Do not fasten off.
Round 6: Ch 1, hdc in first 9 sts, 2 hdc in next st, [hdc in next 9 sts, 2 hdc in next st] 4 times; join with slip st in first st—55 hdc.
Rounds 7–15: Ch 1, hdc in each st around; join with slip st in first st.
Do not fasten off.
Size Large only:
Round 6: Ch 1, hdc in first 4 sts, 2 hdc in next st, [hdc in next 4 sts, 2 hdc in next st] 9 times; join with slip st in first st—60 hdc.
Rounds 7–16: Ch 1, hdc in each st around; change to D at end of last round; join with slip st in first st.
Do not fasten off.
Rounds 7–16: Ch 1, hdc in each st around; change to D at end of last round; join with slip st in first st.
Do not fasten off.
Size X-Large only:
Round 6: Ch 1, hdc in first 4 sts, 2 hdc in next st, [hdc in next 4 sts, 2 hdc in next st] 9 times; join with slip st in first st—60 hdc.
Round 7: Ch 1, hdc in first 11 sts, 2 hdc in next st, [hdc in next 11 sts, 2 hdc in next st] 4 times; join with slip st in first st—65 hdc.
Rounds 8–17: Ch 1, hdc in each st around; change to D at end of last round; join with slip st in first st.
Do not fasten off.
Right Earflap
Row 1: Ch 2 (counts as first dc here and throughout), skip first 2 sts, (2 dc, ch 1, 2 dc) in next st, skip next st, dc in next st, turn—6 dc and 1 ch-1 space.
Rows 2–8 (9, 10, 11, 12): Ch 2, (2 dc, ch 1, 2 dc) in ch-1 space, dc in top of beginning ch, turn.
Fasten off.
With right side of right earflap facing and back seam to the right, count to the left from earflap and place marker on 18th (20th, 22nd, 24th, 26th) st.
Left Earflap
With right side facing, join D with slip st in marked st and work same as right earflap.
With right side facing, join D with slip st in marked st and work same as right earflap.
Edging
Round 1 (right side): With right side facing, join A with sc in any st at center back between earflaps, *sc in each st to next earflap; working in ends of rows down first side, 2 sc in each row, sc in each st of Row 8 (9, 10, 11, 12); working in ends of rows up other side, 2 sc in each row; repeat from * once, sc in each remaining st; join with slip st in first sc. Fasten off.
Round 1 (right side): With right side facing, join A with sc in any st at center back between earflaps, *sc in each st to next earflap; working in ends of rows down first side, 2 sc in each row, sc in each st of Row 8 (9, 10, 11, 12); working in ends of rows up other side, 2 sc in each row; repeat from * once, sc in each remaining st; join with slip st in first sc. Fasten off.
FINISHING
With B, following pompom maker directions, make three 2” (5 cm) pompoms or make pompoms as follows: Wrap yarn around 2” (5 cm) piece of heavy cardboard (the more wraps, the fuller the pompom). Gently remove wraps from cardboard. Cut a 12” (30.5 cm) length of B and tie it tightly around center of wraps. Do not cut the ends of this center tie. Cut ends of wraps. Fluff and trim pompom. Use ends of center tie to attach pompoms.Tie one pompom to top of hat through Round 1 and one pompom through ch-1 space at end of each earflap. Weave in ends.
With B, following pompom maker directions, make three 2” (5 cm) pompoms or make pompoms as follows: Wrap yarn around 2” (5 cm) piece of heavy cardboard (the more wraps, the fuller the pompom). Gently remove wraps from cardboard. Cut a 12” (30.5 cm) length of B and tie it tightly around center of wraps. Do not cut the ends of this center tie. Cut ends of wraps. Fluff and trim pompom. Use ends of center tie to attach pompoms.Tie one pompom to top of hat through Round 1 and one pompom through ch-1 space at end of each earflap. Weave in ends.
ABBREVIATIONS
A, B, C = Color A, Color B, Color C, etc.; ch = chain; dc = double crochet; hdc = half double crochet; sc = single crochet; st(s) = stitch(es); ( ) = work directions in parentheses into same st; [ ] = work directions in brackets the number of times specified; * = repeat whatever follows the * as indicated.
A, B, C = Color A, Color B, Color C, etc.; ch = chain; dc = double crochet; hdc = half double crochet; sc = single crochet; st(s) = stitch(es); ( ) = work directions in parentheses into same st; [ ] = work directions in brackets the number of times specified; * = repeat whatever follows the * as indicated.
Visit my Website
Join me on Facebook
Subscribe to the Maggie Weldon YouTube Channel for more crochet lesson videos
Subscribe to Maggie’s Crochet YouTube Channel for product reviews
Sign Up for My Newsletter
Follow us on Pinterest
Follow us on Twitter


No Comments