From RedHeart.com
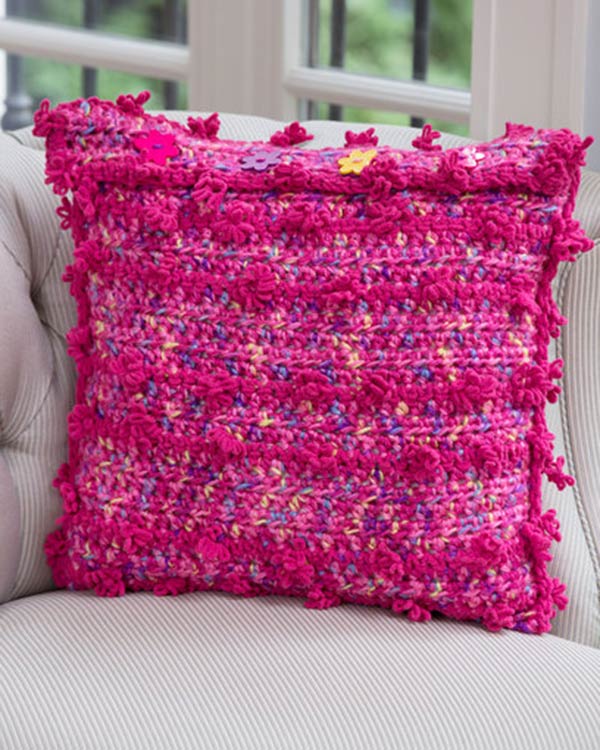
Posh Pillows
LW3855
Designed By: Randy Cavaliere
Skill Level: Easy
RED HEART® Gumdrop®: 3 balls 620 Cherry (A)
1. Hold two strands of A together throughout.
2. Working with B:
a. The yarn is comprised of a strand of chenille and a strand of thread. Treat the yarn as if it were one strand; do not work into spaces between the chenille and thread.
c. Begin each wrong side row with a plain section of yarn, not at a cluster of loops (if necessary, cut off the first cluster before joining the yarn at the end of the previous row). When you reach a cluster, do not work into it or pull through a loop; instead, guide it to the right side of the fabric and continue to crochet with the plain sections of the strand.
3. To change yarn at the end of a row or round, work last stitch of old yarn to last yarn over. Yarn over with new yarn and draw through all loops on hook to complete stitch. Proceed with new yarn. Cut old yarn.
4. Catch the tails behind the stitching of the next row to minimize weaving in ends. Weaving in doesn’t need to be too precise as all ends will be tucked into the wrong side of the pillow cover before the pillow form is inserted.
5. If your buttons are sew-through style with holes, be sure to create a shank when sewing to the pillow cover so the fabric doesn’t tug when buttoned.PILLOW COVER
With 2 strands of A held together, ch 37.
Row 1 (right side): Hdc in 3rd ch from hook (beginning ch counts as first hdc) and in each ch across, turn—36 hdc.Rows 2–5: Ch 2 (counts as first hdc here and throughout), hdc in each st across; change to B at end of Row 5, turn.
Row 6: Ch 1, loosely sc in each st across; change to A, turn—36 sc.
Rows 7–9: Repeat Row 2 three times; change to B at end of Row 9.
Row 10: Repeat Row 6.
Rows 11–15: Repeat Row 2 five times; change to B at end of Row 15.
Rows 16–65: Repeat Rows 6-15 five times.
Flap
Row 66: Repeat Row 6. Note. Place a stitch marker at each end of row for assembly.
Rows 67 and 68: Repeat Row 2 twice.
Row 69 (buttonhole row): Ch 2, hdc in first 6 sts, ch 2, skip next 2 sts (for buttonhole), hdc in next 5 sts, ch 2, skip next 2 sts, hdc in next 6 sts, ch 2, skip next 2 sts, hdc in next 5 sts, ch 2, skip next 2 sts, hdc in remaining sts, turn—28 hdc and 4 ch-2 spaces (for buttonholes).
Row 71: Ch 2, *hdc in each st to next ch-2 space, hdc in next 2 ch; repeat from * 3 times, hdc in remaining sts—36 hdc. Fasten off. Fold cover at Row 33 so that Row 1 is aligned with marked row and all B rows match. Pin sides together. Hold cover with wrong side of flap facing and to your left (hold to your right if you are left-handed).
Row 72: Working through both thicknesses and across ends of rows between first 2 sts, join B with sc in first row at bottom of cover, sc evenly spaced across ends of rows and flap to last row, 3 sc in first st, sc in each st to last st, 3 sc in last st, working across ends of rows, sc evenly spaced across other end of flap and ends of rows through both thicknesses and between first 2 sts. Fasten off
FINISHING
Weave in ends. Insert pillow form, fold flap over and mark placement for buttons under each buttonhole. Sew buttons with yarn needle and 1 strand of A or sewing needle and matching thread.
ABBREVIATIONS
A and B = Yarn A, and Yarn B; ch = chain; hdc
= half double crochet; sc = single crochet;
st(s) = spaces; * = repeat whatever follows
the * as indicated.
Be sure to…
Visit my Website
Join me on Facebook
Subscribe to the Maggie Weldon YouTube Channel for more crochet lesson videos
Subscribe to Maggie’s Crochet YouTube Channel for product reviews
Sign Up for My Newsletter
Follow us on Pinterest
Follow us on Twitter

No Comments