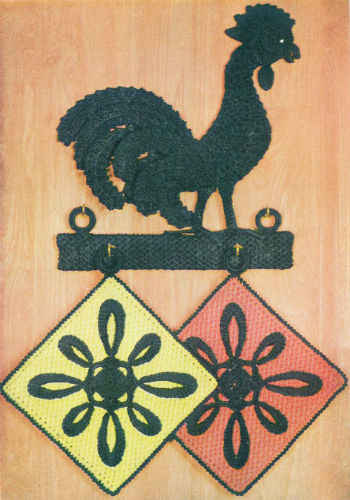
This unique design comes from a book called Wrought Iron Crochet, published in 1954 by Lily. In black these designs do look just like wrought iron. Imagine this design worked in vibrant colors to match your kitchen décor. If you make this design please send pictures. We would love to see them.
Included in the book are directions for starching as follows: Dissolve 2 heaping tablespoons Argo Gloss Starch in ½ cup cold water, add to 1 quart war water, heat and boil briskly for several minutes, stirring constantly. Add 2 cups cold water and cool until comfortable to handle. Dip crochet in starch, squeezing the starch thru it thoroughly. Remove, squeeze out excess starch, roll in paper towels and leave for an hour or two. Then rub off any excess starch with paper towel, stretch and block as given in individual instructions.
Wrought Iron Rooster Potholder Set
FP322
Edited By: Maggie Weldon
Copyright 2011 Maggie Weldon
Skill: Easy
Size: Rooster – About 9½ inches high.
Materials: Lily Double Quick: Black – 4 skeins, Flamingo & Chartreuse – 1 skein each.
Small amount White Embroidery Thread.
Black covered millinery wire or any stiff wire – 3⅓ yd;
Small cup hooks – 2; ¾” Brass rings – 4.
Cardboard Strips, Starch.
Crochet Hook: Steel size 3 (2.10 mm).
JOINING WITH SC
When instructed to join with sc, begin with sl knot on hook, insert hook in st or sp indicated, yo and pull up a loop, yo and draw through both loops on hook.
Special Stitches
Single Crochet Decrease: (sc dec): Draw up a lp in each of next 2 sts, yo, draw through 3 lps on hook.
Small Shell (Sm-Shell): (sc, ch 2, sc) in same st or sp indicated.
Shell: (2 dc, ch 2, 2 dc) in same st or sp indicated.
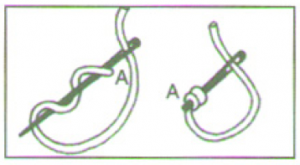
French Knot : Bring yarn-threaded needle up from wrong to right side of work at A. Wrap yarn twice around needle. Tighten the twists and insert needle again at A. Pull needle with firm even pressure until the yarn slides through the wrapped yarn, making a knot that lies on the right side as shown below.
Starching Instructions
Dissolve 2 heaped tablespoons Argo Gloss Starch in ½ cup cold water. Add to 1 quart warm water. Heat and boil briskly for several minutes, stirring constantly. Add 2 cups cold water and cool until comfortable to handle. Dip crochet pieces in starch, squeezing the starch through it thoroughly. Remove and squeeze out excess starch. Roll in paper towels and leave for an hour or two. Then rub off any excess starch with paper towel. Stretch and block piece as instructed.
ROOSTER
Body
Row 1: (Right Side) Starting at neck, with Black, ch 14, Sm-Shell in 2nd ch from hook, [skip next 2 ch, Sm-Shell in next ch] 4 times.
Rows 2-7: Ch 3, turn, (dc, ch 2, 2 dc) in first shell, Sm-Shell in next 3 shells, Shell in last shell.
Rnd 8: Ch 1, turn, Sm-Shell in first shell, Shell in next 3 shells, Sm-Shell in last shell.
Row 9: Ch 1, turn, Sm-Shell in first shell, [Shell in next shell, dc between Shells] twice, Shell in next shell, Sm-Shell in last shell.
Row 10: Ch 1, turn, Sm-Shell in first 2 shells, * (dc, ch 2, dc) in dc between shells, Shell in next shell, * (dc, ch 2, dc) in dc between shells, Sm-Shell in last 2 shells.
Rows 11-12: Ch 1, turn, Sm-Shell in first 2 shells, [Shell in next shell, dc between Shells] twice, Shell in next shell, Sm-Shell in last 2 shells.
Row 13: Ch 1, turn, Sm-Shell in first 2 shells, Shell in next shell, [(dc, ch 2, dc) in dc between shells, Shell in next shell] twice; Sm-Shell in last 2 shells.
Rows 14-16: Ch 1, turn, Sm-Shell in first 2 shells, [Shell in next shell, dc between shells] 4 times, Shell in next shell, Sm-Shell in last 2 shells.
Rows 17-23: Ch 1, turn, Sm-Shell in first 3 shells, [dc between shells, Shell in Shell] 3 times, dc between shells, Sm-Shell in last 3 shells.
Rows 24-26: Ch 1, turn, Sm-Shell in first 4 shells, dc between shells, Shell in next shell, dc between shells, Sm-Shell in last 4 shells.
Row 27: Ch 1, turn, Sm-Shell in next 9 shells across.
Row 28: Ch 1, turn, Sm-Shell in first 3 shells, sc in next shell, Sm-Shell in next shell, sc in next shell, Sm-Shell in last 3 shells.
Row 29: Ch 1, turn, Sm-Shell in first 2 shells, sc in next shell, Sm-Shell in next shell, sc in next shell, Sm-Shell in last 2 shells.
Row 30: Ch 1, turn, Sm-shell in first shell, [sc in next shell, Sm-Shell in next shell] twice. Finish off and weave in ends.
Head (Make 2)
Rnd 1: (Right Side) Starting at center, with Black, ch 2, (sc, hdc, 6 dc, hdc sc) in 2nd ch from hook; join with sl st to first sc.
Rnd 2: Ch 1, 2 sc in same st as joining, 3 hdc in next st, 3 dc in next st, [4 tr in next st] twice, 3 dc in next st, 2 hdc in next st, [2 sc in next st] 3 times, join. DO NOT FINISH OFF.
BEAK
Row 1: With wrong side facing, ch 7, sl st in 2nd ch from hook, sl st in next ch, [draw up a lp in next 2 ch, YO, draw through 3 lps on hook] twice, skip next st on Head, sl st in next 2 sts; ch 4, sl st in 2nd ch from hook, sl st in next ch, sc in next ch, sl st in next 2 sts on Head, sc in next st, hdc in next st, 2 dc in next st. DO NOT FINISH OFF.
WATTLE
Row 1: With wrong side facing, ch10, 2 dc in 3rd ch from hook, tr in next 3 ch, dc in next ch, hdc in next ch, sc in next ch; sl st in dc at base of ch-10, 2 dc in next st on Head, 2 hdc in next st, 2 sc in next st, sl st in next st. DO NOT FINISH OFF.
COMB
Row 1: With wrong side facing, ch 12, sl st in 2nd ch from hook, sc in next ch, hdc in next ch, dc in next 6 ch, hdc in next ch, sc in next ch; sl st in next 2 sts on Head.
Row 2: Ch 1, turn, working in back loops only, skip sl sts, sc in next 7 sts; ch 4, turn, sl st in 2nd ch from hook, sc in next ch, hdc in last ch, dc in next 5 sts, hdc in next st, sc in next st, sl st in next st on Head; ch 1, turn, skip sl st, sc in next 7 sts; ch 3, turn, sl st in 2nd ch from hook, sc in last ch, hdc in next 5 sts, sc in next 2 sts, sl st in next st on Head; [ch 1, turn, sc in 7 sts] twice, sl st in next st on Head; [ch 1, turn, sc in each sc to 2nd last st, ch 2, turn, sc in each sc across, sl st in next st on Head] 5 times. Finish off and weave in ends.
– Sew Head pieces together around Wattles and Beaks up to Combs.
– Sew base of Head over top of neck from Wattle to half of first Row of Comb.
Legs (Make 2)
Rnd 1: (Right Side) Starting at center, with Black, ch 12, join with sl st to first ch to form ring; ch 1, 14 sc in ring. DO NOT JOIN. MARK BEG OF EACH ROUND.
Rnd 2: Working in back loops only, [sc dec, sc in next 5 sc] twice. (12 sc)
Rnd 3: Working in back loops only, [sc dec, sc in next 4 sc] twice. (10 sc)
Rnd 4: Working in back loops only, [sc dec, sc in next 3 sc] twice. (8 sc)
Rnd 5: Working in back loops only, sc in each sc around.
Repeat Rnd 5 until first leg measures 1¾ inches and second Leg measures 1⅞ inches. DO NOT FINISH OFF.
– Cut 8 lengths of wire 10¼ inches long. (4 pieces for each Leg)
– For each wire piece, fold one end over ½ inch.
– Bend wire at right angles (for toe) 1¼ inches from folded end.
TOES
Sl st in next st, * ch 10. Using one piece of wire, insert long end up through Leg, sl st in folded end of wire; ch 1, working over the wire, sc in next 10 ch, ** sl st in next st to left around Leg on side facing, repeat from * twice; sl st in next 2 sc, repeat from * to **, sl st in next 2 sc, join. (4 Toes) Finish off and weave in ends. Repeat for second Leg.
For First Leg:
– Tape top end of 4 wires together and push through bottom of Body on left side of center row of large Shells.
– Sew top of Leg to Body.
– Sew top of wires to back of left-side Head piece.
For Second Leg
– Tape top end of 4 wires together and push through Body on other side of large Shells ahead of first Leg.
– Sew Leg in place.
– Sew wire tops to back of other Head piece.
Tail Feathers
– Cut 2 lengths of wire 7¼ inches long.
– Cut 1 lengths of wire 6½ inches long.
– Cut 2 lengths of wire 4¼ inches long.
– Cut 2 lengths of wire 3½ inches long.
– For each wire length, fold one end over ½ inch.
Row 1: (Right Side) For each Feather, with Black, make a chain ½ inch shorter than length of wire, sl st in folded end of wire, ch 1, working over wire, sc in each ch across.
Row 2: Ch 4, turn, skip first ch, sc in next 3 ch, working in Row 1, skip first sc, * sl st in next 3 sc, ch 1, turn, skip next (3 sl sts and sc), working in back loops only, sc in 2 sc, ch 3, turn, skip first ch, sc in next 2 ch, working in back loops only, sc in next sc; repeat from * to end; for tip of feather: sl st in same end st, ch 1, turn, skip first sc, sc in next 2 sc, ch 3, turn, skip first ch, sc in next 2 ch, sc in next 2 sc, sl st in same end st; working frond on other side of wire: **ch 1, turn, sc in first 2 sc, ch 1, turn, sc in first sc, 2 sc in next sc, sl st in next 3 sts down other side of wire; rep from ** across to end. Finish off and weave in ends.
– Rep for all lengths of Feathers.
– Sew Feathers on end of Body, pushing wire ends through sides of Body and sewing down on inside.
– Sew Body together down back.
– Make a large White French Knot on each side of Head for eyes.
BASE
Row 1: (Right Side) Starting at long edge, with Black, ch 61, skip first ch, sc in next 60 ch.
Row 2: Ch 1, turn, sc in each sc across.
-Rep Row 2 until Base measures 3 inches. Finish off leaving long end.
– Using long end, sew last row to Row 1.
– Sew Rooster’s feet to top edge of Base.
– Starch. When dry, cut 2 or 3 heavy cardboard strips and push inside Base. Sew ends of Base closed.
– Screw a cup hook into Base, 2 inches from each end.
– Cover 2 brass rings closely with sc. Sew covered Rings on top of Base, 1 inch from ends.
POTHOLDERS (Make 1 Flamingo, 1 Chartreuse)
Row 1: (Right Side) Starting at bottom, ch 39, skip first ch, sc in next 38 ch.
Row 2: Ch 1, turn, sc in first sc, (sc at base of next sc (long sc), sc in next sc) repeated across, ending with long sc.
– Repeat Row 2 until piece is square. DO NOT FINISH OFF.
Edging
Rnd 1: Ch 1, turn, 3 sc in first sc (corner), * sc in each st across to last st, 3 sc in last st (corner), working in sides of rows, (2 sc in next row, sc in next) across, * working in starting ch on other side, 3 sc in first ch; rep from * to *; join with sl st to first sc. Finish off and weave in ends.
Rnd 2: With right side facing, join Black with sl st to any corner sc, (ch 1, sl st in next sc) around, join. Finish off and weave in ends.
– Cover a brass ring closely with sc and sew to one corner of Potholder.
MOTIF (Make 2)
Rnd 1: (Right Side) Starting at center, with Black, ch 2, 8 sc in 2nd ch from hook; join with sl st to back loop of first sc.
Rnd 2: Ch 3 (counts as first dc now and throughout), 2 dc in same sc, (3 dc in back lp of next sc) 7 times; join with sl st to first dc.
Rnd 3: Ch 1, sc in same st, working in both lps, 3 dc in next dc, sc in next dc, (ch 5, skip 3 dc, sc in next dc, 3 dc in next dc, sc in next dc) 3 times, ch 5; join with sl st to first sc.
Rnd 4: Ch 1, sc in same sc, * sc in next 2 dc, ch 30, swing hook to right, sl st in starting st of ch-30, ch 1, sc in first 5 ch of ch-30, hdc in next 5 ch, dc in next 4 ch, 5 dc in next ch, dc in next 4 ch, hdc in next 5 ch, sc in next 4 ch, sl st in next ch, sl st in base of lp, sc in same corner dc, sc in next 2 sts, 3 sc in next ch-5 lp, ch 20, make a lp as before with sl st in starting st of ch-20, ch 1, sc in 1st 4 ch, hdc in next 3 ch, dc in next 2 ch, 5 dc in next ch, dc in next 2 ch, hdc in next 3 ch, sc in next 3 ch, sl st in end ch, sl st in base of lp, 3 sc in bal. of ch-5 lp, sc in next sc; repeat from * 3 times; join with sl st to first sc. Finish off and weave in ends.
– Sew Motif to front of Pot Holder.
– Steam and press Holders on back through a cloth until dry.
– Hang on cup hooks.
All Rights Reserved ©2011 Maggie Weldon
Enjoy,
Maggie


No Comments