
While most needlework originated out of necessity, it flourishes out of a need to create something beautiful and a need to share that beauty with loved ones.
Judging by the great condition of many vintage potholders, I don’t think they were used in cooking that much. Working them with crochet cotton thread makes them rather unsafe in protecting your hands from hot pans. If you want to actually use these vintage potholder designs in cooking I highly suggest lining the inside with a store bought potholder or layers of cotton quilt batting. Another good idea would be to set hot pans on the backside of your potholder to protect the front from scorch marks. I have seen a few old potholders that have a cotton backing added to them that shows signs of scorching. The front of the potholder is like new but the back shows all the wear and tear from use.
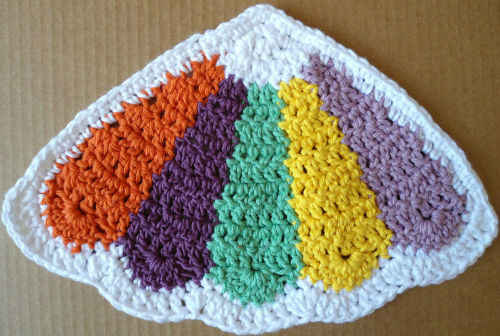
This Queens Anne’s Lace potholder is a classic vintage crochet pattern. There are two versions shown here that have been worked in two varieties of crochet cotton yarn.
Queen Anne’s Lace Vintage Potholder
FP315
Edited By: Maggie Weldon
Copyright 2010 Maggie Weldon
Skill: Easy
Size: About 6” diameter
Materials: Size 10 Crochet Thread: White and Blue.
Crochet Hook: Steel size 7 (1.65 mm)
JOINING WITH SC
When instructed to join with sc, begin with sl knot on hook, insert hook in st or sp indicated, yo and pull up a loop, yo and draw through both loops on hook.
MOTIF
Rnd 1: (Right Side) Starting at center, with Blue, ch 6, join with sl st to first ch to form ring; ch 6 (counts as first tr and ch 2), * tr in ring, ch 2; rep from * 6 times more; join with sl st to first tr. (8 ch-2 sps)
Rnd 2: Ch 3 (counts as first dc), 4 dc in first sp, ch 1, * 5 dc in next sp, ch 1; rep from * around; join with sl st to first dc. (40 dc)
Rnd 3: Ch 4 (counts as first tr), 2 tr in next 3 dc, tr in next dc ch 3, * tr in next dc, 2 tr in next 3 dc, tr in next dc, ch 3; rep from * around; join. (64 tr)
Rnd 4: Ch 4, keeping last lp of next 4 tr on hook, (skip next tr, tr in next tr) 4 times, yo and pull through all lps on hook (first cluster made), ch 7, sl st in ch-3 lp, * ch 7 keeping last lp of next 5 tr on hook, tr in next tr, (skip next tr, tr in next tr) 4 times, yo and pull through all lps on hook (cluster made), ch 7, sl st in ch-3 lp; rep from * around, ending ch 3, tr in first cl. (8 cl)
BACK
Rnd 1: (Right Side) Starting at center, with White, ch 6, join with sl st to first ch to form ring; ch 3 (counts as first dc now and throughout), 15 dc in ring; join with sl st to first dc. (16 dc)
Rnd 2: Ch 3, dc in same st as joining, (2 dc in next dc) around. (32 dc)
Rnd 3: Ch 3, 2 dc in next dc, (dc in next dc, 2 dc in next dc) around. (48 dc)
Rnd 4: Ch 3, dc in next dc, 2 dc in next dc, (dc in next 2 dc, 2 dc in next dc) around. (64 dc)
Rnd 5: Ch 3, dc in next 2 dc, 2 dc in next dc, (dc in next 3 dc, 2 dc in next dc) around. (80 dc)
Rnd 6: Ch 3, dc in next 3 dc, 2 dc in next dc, (dc in next 4 dc, 2 dc in next dc) around. (96 dc)
Rnd 7: Ch 3, dc in next 4 dc, 2 dc in next dc, (dc in next 5 dc, 2 dc in next dc) around. (112 dc)
Rnd 8: Turn, position Motif with right side facing to center of Back, working over any ch-10 lp of Motif, ch 8 (counts as first dc and ch 5), * skip next 3 dc, working over next ch-10 lp, dc in next 4 dc, ch 5; rep from * around, ending with skip next 3 dc, working over next ch-10 lp, dc in next 3 dc; join. (64 dc, 16 ch-5 sps)
Rnd 9: Sl st to ch-5 sp, ch 3, (2 dc, ch 4, 3 dc) in same sp, ch 1, * (3 dc, ch 4, 3 dc) in next ch-5 sp, ch 1; rep from * around; join.
Rnd 10: Sl st to ch-4 sp, ch 3, 7 dc in same sp, sl st in ch-1 sp, * 8 dc in next ch-4 sp, sl st in next ch-1 sp; rep from * around; join. Finish off and weave in ends.
Edging
Rnd 1: With right side facing, join Blue with sc to any dc, working over sl sts into ch-1 sps, sc in each dc and ch-1 sp around, working hanger as follows:
– After any sc in ch-1 sp work sc in next 4 dc, ch 10, sl st in 8th previous dc worked, work 16 sc over ch, working in Rnd 11, continue Edging; joining with sl st to first sc. Finish off and weave in ends.
All Rights Reserved ©2010 Maggie Weldon
Enjoy,
Maggie

These are exactly what I love to place on my holiday tables as trivets!!.. Practical, but very pretty too! Thanks Maggie! Hope you and yours had a very Happy Thanksgiving! ~tina
Beautiful – I can hardly wait to crochet these for my kitchen decor and for gifts. Thanks for sharing!
Hi Maggie, These potholders sure are beautiful. I have 1 question and 1 comment.
My question: Is row 4 of the directions for the Back really row 3? Or is row 3 missing?
My comment: It’s not important but I think that “ware” at the end of the 2nd introductory paragraph should be spelled “wear”.
Thanks so much for your wonderful designs!
Yes, the rows for the Back were in fact off by one number starting at the third row. We have corrected the numbering and the typo.
Thanks for your comments and help!
Beautiful! There is a product you can get at fabric stores that has a thick padding with mylar in the center just for insulating items like potholders. Makes them safer, but these are too pretty to use!
Hi Lynn,
Thank you for posting your comment on the mylar. I have done some research on this for a future post. I agree they are too pretty to use!
Happy Holidays,
Maggie
There were just a couple little confusing parts in this pattern. Round 3 should say that you are working in double crochets from the previous row, not triple crochets. When you join the two pieces, I thought putting them together with wrong sides facing together made more sense. But it turned out beautifully (http://www.flickr.com/photos/lynnszwalkiewicz/8462666385)
Love your work Maggie. Your instructions on the edging, however are a little confusing at the end.