According to Mexican folklore the poinsettia was an ordinary green weed until two children, not so fortunate as their friends to have enough money to do what their hearts yearn for, presented an armload of wild weeds as a gift to baby Jesus at the town’s annual Nativity play. Once the weeds were laid around the manger, vibrant red star-shaped flowers spontaneously bloomed from the weeds creating the poinsettia we are familiar with today.
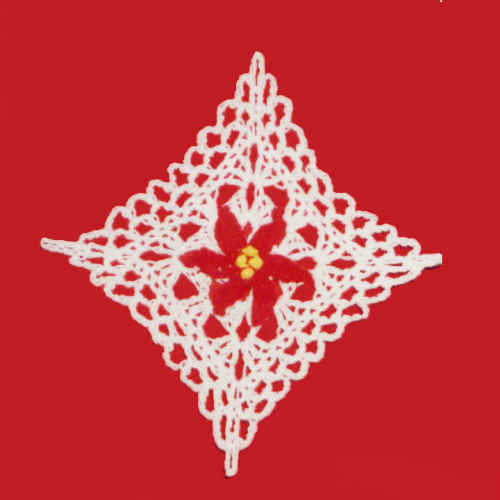
Now you can create a vibrant poinsettia ornament with this easy crochet ornament pattern.
For more fabulous crochet patterns visit: www.MaggiesCrochet.com
Poinsettia Granny Christmas Ornament
FP285
Original Design By: Maggie Weldon
Copyright 2010 Maggie Weldon
Skill: Easy
Size: About 5″ across
Materials: Size 10 Crochet Cotton: White (W) – 20 yards, Red (R) – 10 yards, and Yellow (Y) – 1 yd.
Crochet Hook: Steel 7 (1.65 mm)
JOINING WITH SC
When instructed to join with sc, begin with sl knot on hook, insert hook in st or sp indicated, yo and pull up a loop, yo and draw through both loops on hook.
SPECIAL STITCHES
Picot: Ch 3, sl st in first ch.
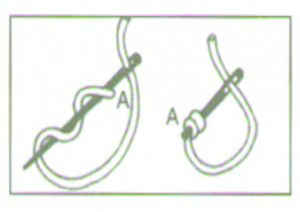
French Knot: Bring threaded needle up from wrong to right side of work at A. Wrap thread twice around needle. Tighten the twists and insert needle again at A. Pull needle with firm even pressure until the thread slides through the wrapped thread, making a knot that lies on the right side as shown below.
General Starching Directions
Cut a piece of cardboard larger than the article to be stiffened. Cover the cardboard with clear plastic wrap.
Lay the article on the plastic, stretch out and pin into the correct shape.
Generously spray with heavy spray starch. Allow to dry completely.
This method allows for washing and re-starching whenever necessary.
GRANNY SQUARE
Rnd 1: (Right Side) Starting at center, with White, ch 6, sl st in first ch to form ring; ch 3 (counts as first dc now and throughout), 2 dc in ring, ch 3, (3 dc in ring, ch 3) 3 times; join with sl st to first dc. (12 dc)
Rnd 2: Ch 3, turn, (2 dc, ch 3, 3 dc) in ch-3 sp, ch 1, * (3 dc, ch 3, 3 dc) in next ch-3 sp, ch 1; rep from * around; join.
Rnd 3: Ch 3, turn, 2 dc in ch-1 sp, ch 1, (3 dc, ch 3, 3 dc) in next ch-3 sp, ch 1, * 3 dc in ch-1 sp, ch 1, (3 dc, ch 3, 3 dc) in next ch-3 sp, ch 1; rep from * around; join.
Rnd 4: Ch 1, DO NOT TURN, sc in same st as joining, (sc in next st) around, working (2 sc, ch 2, 2 sc) in each corner ch-3 sp; join with sl st to first sc.
Rnd 5: DO NOT TURN, ch 4, * skip next sc, sc in next sc, ch 3; rep from * around working (sc, ch 5, sc) in each corner ch-2 sp, ending with ch 1, hdc in first ch of beg ch-4 (forms last lp and positions thread for next rnd).
Rnd 6: Ch 5, * sc in next lp, ch 4; rep from * around, working (sc, ch 7, sc) in each corner ch-5 sp, ending with sl st in first ch of beg ch-5. Finish off and weave in ends.
POINSETTIA
Rnd 1: (Right Side) Starting at center, with R, ch 2, 6 sc in 2nd ch from hook; join with sl st to first sc.
DO NOT TURN EACH ROUND.
Rnd 2: * Ch 6, sl st in 2nd ch from hook, sc in next ch, dc in next 2 ch, hdc in next ch, sl st in next st of Rnd 1 (petal made), rep from * around, ending with sl st in same sp as joining.
Finish off and weave in ends.
Finishing
– Using a double strand of Yellow thread; sew Poinsettia to center of Square with 4 French Knots.
– Starch as directed in general directions stretching and pinning corners to measure 5″ across.
All Rights Reserved ©2010 Maggie Weldon
Enjoy,
Maggie


Thank you so much for the free pattern
Ruth