Sometimes it is fun to choose crochet cotton thread in unusual colors that will make your creation a stunning beauty!
One of the tricks I have found useful when working with thread is to create more tension on the thread to keep it from slipping so freely through your fingers. I create more tension by wrapping the thread around my finger one more time than I do with yarn. Another idea would be to string something onto the thread like a metal washer or multiple washers. As the thread passes under the weight of the washers, the thread flows through your hand slower making it easier to work with.
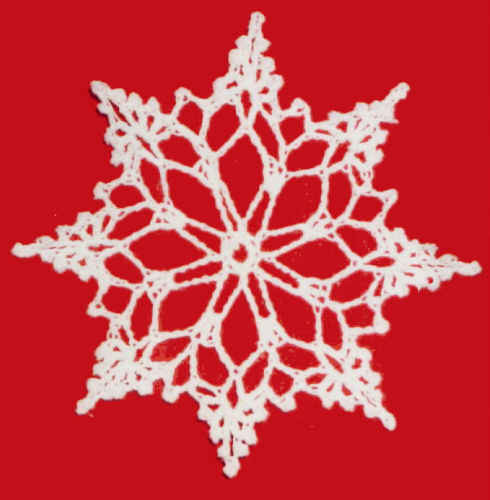
This snowflake design would make a beautiful addition to your heirloom collection of Christmas ornaments. It would also be a great quick and easy project to add to a gift for family and friends.
Snowflake Christmas Ornament
FP289
Original Design By: Maggie Weldon
Copyright 2010 Maggie Weldon
Skill: Easy
Size: About 5” across
Materials: Size 10 Crochet Cotton: White (W) – 15 yards.
Crochet Hook: Steel 7 (1.65 mm)
JOINING WITH SC
When instructed to join with sc, begin with sl knot on hook, insert hook in st or sp indicated, yo and pull up a loop, yo and draw through both loops on hook.
Special Stitches
V-Stitch (v-st): (dc, ch 3, dc) in same st or sp.
General Starching Directions
Cut a piece of cardboard larger than the article to be stiffened. Cover the cardboard with clear plastic wrap.
Lay the article on the plastic, stretch out and pin into the correct shape.
Generously spray with heavy spray starch. Allow to dry completely.
This method allows for washing and re-starching whenever necessary.
SNOWFLAKE
Rnd 1: (Right Side) Starting at center, with White, ch 5, sl st in first ch to form ring; ch 1, 8 sc in ring; join with sl st to first sc. (8 sc)
DO NOT TURN EACH ROUND.
Rnd 2: (Ch 10, sc in next sc) 7 times, ch 4, dtr in first sc (forms last lp and positions thread for next rnd).
Rnd 3: Ch 3 (counts as first dc now and throughout), 2 dc in same sp, * ch 7, 3 dc in next lp; rep from * around; join with sl st to first dc.
Rnd 4: Sl st in next dc (center dc), ch 1, sc in same dc, * ch 5, v-st in center ch of next lp, ch 5, sc in center dc of next 3-dc group; rep from * around, ending with ch 2, dc in first sc (forms last lp and positions thread for next rnd).
Rnd 5: Ch 1, sc in same st, * ch 4, sl st in 3rd ch from hook, ch 1, sc in center ch of next lp, ch 1, [dc, (ch 3, sl st in 3rd ch) twice, dc, ch 3, sl st in 3rd ch, ch 5, sl st in 5th ch, ch 3, sl st in 3rd ch, (dc, ch 3, sl st in 3rd ch) twice, dc] in next v-st, ch 1, sc in center ch of next lp; rep from * around, ending with ch 1, join with sl st to first sc. Finish off and weave in ends.
Finishing
– Starch into a star-shaped 5-inch circle using general starching directions.
All Rights Reserved ©2010 Maggie Weldon
Enjoy,
Maggie


Thank you, Maggie, for the beautiful snowflake. However, I did find that the last left parenthesis should be after the dc instead of before the dc. After I figured that out, it worked like a charm. I’ve made it and starched it. Absolutely beautiful. Thank you again.
Thank You from Florida, we have to make snowflakes if we want them where I live.
I plan to spend the winter in Florida this year, so decided to take some “snow” with me. Thanks so much for sharint your beautiful pattern. I can crochet them but have never been able to write patterns. Thank heaven for people like you.
LOL, as you see my typing skills are not so great either. “sharing”
this truly is a beautiful snowflake pattern. thankyou so much for making this. It will look very nice on our tree.
I read Ramona’s comment and couldn’t figure out which dc she was referring to. I’m using this pattern for the second time and finally realized what she meant. I figured I’d correct the final round for future crocheters. 🙂
Thanks for sharing your pattern! It looks nice on our tree this year. ;D
Rnd 5: Ch 1, sc in same st, * ch 4, sl st in 3rd ch from hook, ch 1, sc in center ch of next lp, ch 1, [dc, (ch 3, sl st in 3rd ch) twice, dc, ch 3, sl st in 3rd ch, ch 5, sl st in 5th ch, ch 3, sl st in 3rd ch, dc, (ch 3, sl st in 3rd ch) twice, dc] in next v-st, ch 1, sc in center ch of next lp; rep from * around, ending with ch 1, join with sl st to first sc. Finish off and weave in ends.