From www.RedHeart.com
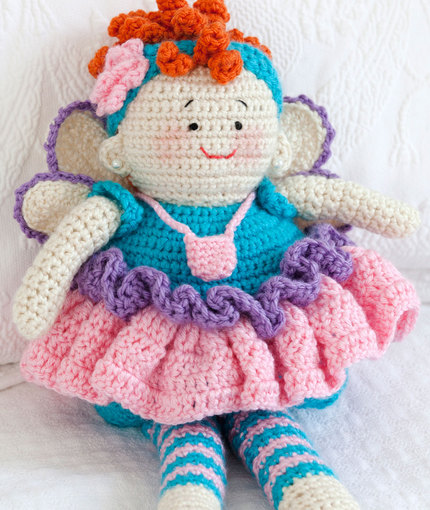
Tooth Fairy Doll Free Crochet Pattern
Pattern Number: LW2562
Designed By: Michele Wilcox
Skill Level: Easy
Required Supplies:
RED HEART® Soft Yarn®: 1 ball each of 4601 Off White A, 4422 Tangerine B, 9528 Lilac C, 6768 Pink D, and 2515 Turquoise E
Crochet Hook: 3.75mm [US F-5] and 3.25mm [US D-3] (for tooth necklace only)
Yarn needle
stitch marker
Additional Supplies Needed:
2 pearls (for earrings), small amounts of black and red pearl cotton (for facial features), red crayon (for coloring cheeks), stuffing.
Start a new tradition instead of leaving a child’s tooth under the pillow, put it in this tooth fairy’s little pouch. It makes the tooth fairy’s job so much easier.
Gauge/Tension: GAUGE: 19 sts = 4″; 20 rows = 4″ in single crochet using larger hook. CHECK YOUR GAUGE. Use any size hook to obtain the gauge.
Doll measures 16” tall.
Special Stitch
sc2tog = [Draw up a loop in next st] twice, yarn over and draw through all 3 loops on hook.
NOTE
To change color, work last stitch of old color to last yarn over. Yarn over with new color and draw through all loops on hook to complete stitch. Proceed with new color. Fasten off old color.
TOOTH NECKLACE
With smaller hook and D, ch 5.
Round 1: Sc in 2nd ch from hook, sc in next 2 ch, 3 sc in last ch; working across opposite side of foundation ch, sc in next 2 ch, 2 sc in last ch—10 sc. Do not join, work in continuous rounds (spirals). Place a marker for beginning of round. Move marker up as each round is completed.
Rounds 2–5: Sc in each sc around.
Handle: Ch 45, slip st in 2nd ch from hook and in each remaining ch across, slip st in 4 sc across top of tooth pocket, slip st into 45th ch. Fasten off.
FRONT OF DOLL
Head
With larger hook and A, ch 10.
Row 1: Sc in 2nd ch from hook and in each remaining ch across, turn—9 sc.
Row 2: Ch 1, 2 sc in each sc across, turn—18 sc.
Row 3: Ch 1, sc in each sc across, turn.
Row 4: Ch 1, [sc in next 5 sc, 2 sc in next sc] 3 times, turn—21 sc.
Rows 5–15: Ch 1, sc in each sc across, turn.
Row 16: Ch 1, [sc in next 5 sc, sc2tog] 3 times, turn—18 sc.
Row 17: Ch 1, *sc2tog; repeat from * across, turn—9 sc.
Row 18: Ch 1, sc in each sc across; change to E in last sc, turn.
Body
Row 19: With E, ch 1, 2 sc in each sc across, turn—18 sc.
Row 20: Ch 1, sc in each sc across, turn.
Row 21: Ch 1, *sc in next 2 sc, 2 sc in next sc; repeat from * across, turn—24 sc.
Row 22: Ch 1, sc in each sc across, turn.
Row 23: Ch 1, *sc in next 3 sc, 2 sc in next sc; repeat from * across, turn—30 sc.
Rows 24–41: Ch 1, sc in each sc across, turn.
Row 42: Ch 1, *sc in next 3 sc, sc2tog; repeat from * across, turn—24 sc.
Row 43: Ch 1, *sc in next 2 sc, sc2tog; repeat from * across, turn—18 sc. Fasten off.
BACK OF DOLL
Work same as front of doll, using A for head (Rows 1–18) and E for body (Rows 19–43).
Sew front to back, stuffing before sewing closed.
Headband
With E, ch 41.
Row 1: Sc in 2nd ch from hook and in each remaining ch across, turn—40 sc.
Rows 2–4: Ch 1, sc in each sc across, turn.
Row 5: Ch 1, working in front loops only, slip st in each sc across (for front edge of headband). Fasten off.
Ponytail Curls (Make 11)
With B, ch 12.
Row 1: Work 2 sc in 2nd ch from hook and in each remaining ch across—22 sc. Fasten off.
Curls for Bangs (Make 3)
With B, ch 7.
Row 1: Work 2 sc in 2nd ch from hook and in each remaining ch across—12 sc. Fasten off.
Sew bangs, grouped together, on center front of head.
Wrap headband around head, covering sewn ends of bangs, and sew in place. Sew ponytail curls, grouped together, on top of head.
Flower (for Headband)
With D, ch 5; join with slip st in first ch to form a ring.
Round 1: Work 12 sc in ring—12 sc. Do not join.
Round 2: Working in front loops only, (slip st, ch 1, hdc) in first sc, hdc in next sc, *ch 1, (slip st, ch 1, hdc) in next sc, hdc in next sc; repeat from * around—6 petals.
Round 3: Gently push petals forward and work in the unworked back loops of Round 1; (slip st, ch 1, dc) in back loop of first sc, dc in next back loop, *ch 1, (slip st, ch 1, dc) in next back loop, dc in next back loop; repeat from * around, slip st in first slip st. Fasten off.
Sew flower onto headband, at side of head.
Skirt Ruffle
With C, ch 60.
Row 1: Sc in 2nd ch from hook and in each remaining ch across, turn—59 sc.
Row 2 (Right Side): Ch 4 (counts as tr), working in front loops only, 2 tr in first sc, 3 tr in each remaining ch across—177 tr. Fasten off.
Skirt
With Right Side of skirt ruffle facing, join D with slip st in first unworked back loop of Row 1.
Row 1: Ch 4 (counts as tr), 2 tr in same back loop as join, working in remaining unworked back loops of skirt ruffle
Row 1, 3 tr in each back loop across, turn—177 tr.
Rows 2–4: Ch 3, dc in each st across, turn.
Fasten off.
Leg (Make 2)
Beginning at foot, with A, ch 7.
Row 1: Sc in 2nd ch from hook, sc in next 4 ch, 3 sc in last ch; working across opposite side of foundation ch, sc in
next 4 ch, 2 sc in last ch, turn—14 sc.
Rows 2–8: Ch 1, sc in each sc across, turn; change to E in last sc of Row 8.
Rows 9 and 10: With E, sc in each sc across, turn; change to D in last sc of Row 10.
Rows 11 and 12: With D, sc in each sc across, turn; change to E in last sc of Row 12.
Rows 13–28: Repeat Rows 9–12 four times.
Rows 29 and 30: Repeat Rows 9 and 10.
Fasten off.
Sew side edges together to form tube. Stuff leg as you sew.
Toes
Join A with slip st to inner side (seamed side) of front of foot.
Row 1: Ch 1, 2 hdc in same space as join (big toe), work [slip st, ch 1, 2 sc (for toe)] 4 times evenly spaced across
bottom of foot. Fasten off.
Sew top of legs closed and sew to bottom of body, placing leg seams to inside of leg.
Arm (Make 2)
Beginning at hand, with A, ch 2.
Row 1: Work 6 sc in 2nd ch from hook, turn—6 sc.
Row 2: Ch 1, *sc in next sc, 2 sc in next sc; repeat from * across, turn—9 sc.
Rows 3–17: Ch 1, sc in each sc across, turn; change to E in last sc of Row 17.
Row 18: With E, sc in each sc across, turn.
Row 19: Ch 1, 2 sc in each sc across, turn—18 sc.
Row 20 (Ruffle): Ch 1, *Slip st in next sc, ch 2, skip next sc; repeat from * across. Fasten off. Sew side edges
together to form tube. Stuff arm as you sew. Fold Row 20 ruffle to outside of arm and sew arms to side of body.
Top Wing (Make 2)
With A, ch 10.
Row 1 (Right Side): Sc in 2nd ch from hook, sc in next ch, hdc in next 3 ch, dc in next 3 ch, 6 dc in last ch; working
across opposite side of foundation ch, dc in next 3 ch, hdc in next 3 ch, sc in next 2 ch, turn—22 sts.
Row 2: Ch 1, sc in first 9 sts, 2 sc in each of next 4 sts, sc in last 9 sts, turn—26 sc.
Row 3: Ch 1, sc in first 11 sc, 2 hdc in next 4 sc, sc in last 11 sc, turn—30 sts. Fasten off A.
Row 4: With Right Side facing, join C with slip st in back loop of first st of Row 3, working in back loops only, *ch 2,
skip next sc, slip st in next sc; repeat from * across to last sc, slip st in last sc. Fasten off.
Bottom Wing (Make 2)
Work same as top wing through Row 2. Fasten off A.
Row 3: Work Row 4 of top wing. Fasten off.
Sew wings in place on back of doll. Sew bottom wings first, then sew the top wings overlapping the bottom wings slightly.
Ear (Make 2)
With A, ch 2.
Row 1: Work 6 sc in 2nd ch from hook, turn.
Row 2 (Right Side): Ch 1, slip st in each sc across. Fasten off. Sew one pearl on each ear. Sew one ear to each side of head, in front of headband.
FINISHING
Weave in ends.
Embroider Face
With small amount of black pearl cotton, embroider French Knot eyes and straight stitch eyebrows. With small amount
of red pearl cotton, embroider back stitch mouth. With red crayon, gently rub color onto face for cheeks. Place tooth
necklace around neck.
ABBREVIATIONS:
A, B, C, D, and E = Color A, B, C, D, and E;
ch = chain;
dc = double crochet;
hdc = half double crochet;
sc = single crochet;
st(s) = stitch(es);
tr = treble crochet;
[ ] = work directions in brackets the number of times specified;
* = repeat whatever follows the * as indicated.
No Comments