From RedHeart.com
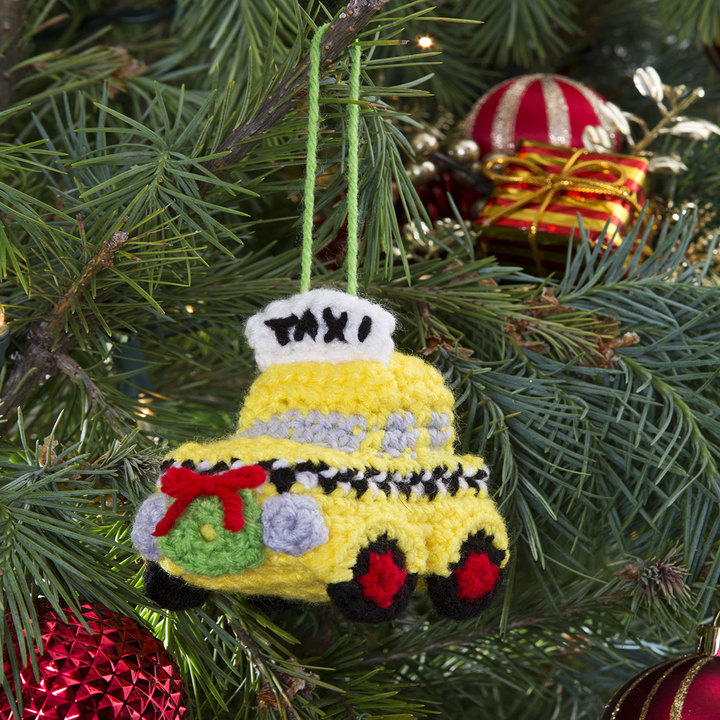
NYC Cab Ornament
Pattern #: LW3176
Designed by Rebecca J. Venton
Project Type: Seasonal, Toy/Kid, Home Decor, Christmas
Skill Level: Easy
Required Supplies:
- RED HEART® Super Saver®: 1 skein each of 324 Bright Yellow A, 316 Soft White B, 312 Black C, 319 Cherry Red D, 672 Spring Green E, 341 Light Grey F
- Susan Bates® Crochet Hook: 3.75mm [US F-5]
- Yarn needle
Additional Supplies Needed:
Fiberfill
GAUGE: 10 sts = 4″ (10 cm); 14 rows = 4″ (10 cm) in single crochet. CHECK YOUR GAUGE. Use any size hook to obtain the gauge.
Ornament measures 3½ x 5” (9 x 12.5 cm)
Notes
1. Gauge is not critical for this project. Work tightly so stuffing will not show between stitches.
2. To change color, work last stitch of old color to last yarn over. Yarn over with new color and draw through all loops on hook to complete stitch. Proceed with new color. Do not fasten off old color until instructed. Carry color not in use across wrong side of piece or under stitches of working color.
BODY
Sides
Beginning at lower edge with A, ch 46; taking care not to twist chains, join with slip st in first ch to form a ring.
Round 1: Ch 1, sc in each ch around; join with slip st in first sc—46 sc.
Rounds 2 and 3: Sc in each sc around; join with slip st in first sc.Fasten off A.
Round 4 (top edge): With right side facing, join B with sc in any st; change to C, sc in next st, *with B, sc in next st; with C, sc in next st; repeat from * around; join with slip st in first sc. Fasten off B and C.
Top and Bottom (make 2)
With A, ch 9.
Row 1: Sc in 2nd ch from hook and in each remaining ch across, turn—8 sc.
Rows 2–16: Ch 1, sc in each sc across, turn.
Fasten off, leaving a long tail for sewing.
With A, ch 9.
Row 1: Sc in 2nd ch from hook and in each remaining ch across, turn—8 sc.
Rows 2–16: Ch 1, sc in each sc across, turn.
Fasten off, leaving a long tail for sewing.
Assemble Body: Use photograph as a guide.
Sew top to top edge of sides. Sew bottom to lower edge of sides, stuffing piece before finishing the sewing.
Sew top to top edge of sides. Sew bottom to lower edge of sides, stuffing piece before finishing the sewing.
CAB
Sides
Beginning at lower edge with A, ch 26; taking care not to twist chains; join with slip st in first ch to form a ring.
Round 1: Join F with sc in same ch as joining, sc in next 2 ch; [with A, sc in next ch; with F, sc in next 2 ch] twice; with A, sc in next ch; with F, sc in next 6 ch; [with A, sc in next ch; with F, sc in next 2 ch] twice; with A, sc in next ch; with F, sc in next 3 ch; join with slip st in first sc—26 sc.
Round 2: With F, sc in same st as joining, sc in next 2 sc; [with A, sc in next sc; with F, sc in next 2 sc] twice; with A, sc in next sc; with F, sc in next 6 sc; [with A, sc in next sc; with F, sc in next 2 sc] twice; with A, sc in next sc; with F, sc in next 3 sc; join with slip st in first sc. Fasten off F, continue with A only.
Round 3: With A, ch 1, sc in each sc around; join with slip st in first sc.
Roof
With A, ch 9.
Row 1: Sc in 2nd ch from hook and in each ch across, turn—8 sc.
Rows 2–6: Ch 1, sc in each sc across, turn.
Fasten off, leaving a long tail for sewing.
With A, ch 9.
Row 1: Sc in 2nd ch from hook and in each ch across, turn—8 sc.
Rows 2–6: Ch 1, sc in each sc across, turn.
Fasten off, leaving a long tail for sewing.
Assemble Cab: Use photograph as a guide.
Sew roof to top of sides. Sew cab to top of body, stuffing piece before finishing the sewing. Do not center the cab on the top of the body, Place it slightly closer to one end (rear of taxi) than the other (front end of taxi).
Sew roof to top of sides. Sew cab to top of body, stuffing piece before finishing the sewing. Do not center the cab on the top of the body, Place it slightly closer to one end (rear of taxi) than the other (front end of taxi).
TIRES (make 4)
Hub Cap
With D, ch 2.
Round 1 (right side): Work 6 sc in 2nd ch from hook; join with slip st in first sc—6 sc.
Fasten off D.
Hub Cap
With D, ch 2.
Round 1 (right side): Work 6 sc in 2nd ch from hook; join with slip st in first sc—6 sc.
Fasten off D.
Back of Tire
With C, ch 2.
Round 1 (right side): Work 6 sc in 2nd ch from hook; join with slip st in first sc, turn—6 sc.
Place hubcap on top of back of tire so that wrong sides of the two pieces are together.
Round 2: Continue with C, ch 1, working through both thicknesses, 2 sc in each sc around; join with slip st in first sc—12 sc.
Fasten off.
Wheel Well
Row 1: Join A with sc in any sc, 2 sc in next sc, [sc in next sc, 2 sc in next sc] twice, sc in next sc; leave remaining sts unworked—10 sc. Fasten off, leaving a long tail for sewing.
Row 1: Join A with sc in any sc, 2 sc in next sc, [sc in next sc, 2 sc in next sc] twice, sc in next sc; leave remaining sts unworked—10 sc. Fasten off, leaving a long tail for sewing.
Attach Tires to Taxi: Sew two tires to each side of body, taking care that wheel wells are at top, the hubcaps face outwards, and the black portion of each tire hangs below the bottom of the taxi.
WREATH
With E, ch 8; taking care not to twist chains, join with slip st in first ch to form a ring.
Round 1: Ch 1, 2 sc in each ch around; join with slip st in first sc—16 sc.
Fasten off, leaving a long tail for sewing. Sew wreath to front of taxi. Cut a length of D, tie small bow to top of wreath.
With E, ch 8; taking care not to twist chains, join with slip st in first ch to form a ring.
Round 1: Ch 1, 2 sc in each ch around; join with slip st in first sc—16 sc.
Fasten off, leaving a long tail for sewing. Sew wreath to front of taxi. Cut a length of D, tie small bow to top of wreath.
HEADLIGHTS (make 2)
With F, ch 2.
Round 1: Work 5 sc in 2nd ch from hook; join with slip st in first sc—5 sc.
Fasten off, leaving a long tail for sewing.
Sew headlights to front of taxi, sewing one headlight on each side of wreath.
With F, ch 2.
Round 1: Work 5 sc in 2nd ch from hook; join with slip st in first sc—5 sc.
Fasten off, leaving a long tail for sewing.
Sew headlights to front of taxi, sewing one headlight on each side of wreath.
“TAXI” SIGN
With B, ch 7.
Row 1: Sc in 2nd ch from hook and in each remaining ch across, turn—6 sc.
Rows 2–5: Ch 1, sc in each sc across, turn.
Fasten off, leaving a long tail for sewing. Fold sign in half, matching stitches of first and last row. Whipstitch first row to last row. With C, embroider “TAXI” to front of sign, making sure that stitches do not show on back of sign. Sew whip stitched edge to top front edge of cab.
FINISHING
With D, embroider two taillights on rear of taxi.
Cut a 7” (18cm) length of E. Thread the length through the taxi sign and tie ends together for hanging loop.
Weave in any remaining ends.
With D, embroider two taillights on rear of taxi.
Cut a 7” (18cm) length of E. Thread the length through the taxi sign and tie ends together for hanging loop.
Weave in any remaining ends.
ABBREVIATIONS
A, B, C, D, E, and F = Color A, B, C, D, E, and F; ch = chain; sc = single crochet; st(s) = stitch (es); [] = work directions in brackets the number of times specified; * = repeat whatever follows the * as indicated.
A, B, C, D, E, and F = Color A, B, C, D, E, and F; ch = chain; sc = single crochet; st(s) = stitch (es); [] = work directions in brackets the number of times specified; * = repeat whatever follows the * as indicated.
Be sure to…
Visit my Website
Join me on Facebook
Subscribe to the Maggie Weldon YouTube Channel for more crochet lesson videos
Subscribe to Maggie’s Crochet YouTube Channel for product reviews
Sign Up for My Newsletter
Follow us on Pinterest
Follow us on Twitter

No Comments