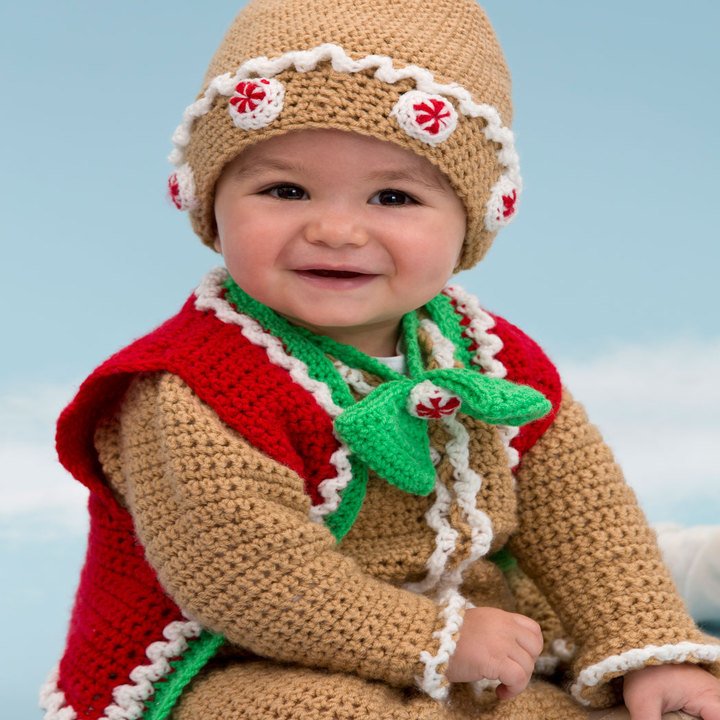
Gingerbread Baby Set
You hear people say that a baby looks good enough to eat — you can make it actually happen with this darling, gingerbread man outfit for your little one. The crocheted, one-piece romper is accessorized with a rickrack-trimmed vest, peppermint beanie and spiffy bow tie. It’s the perfect outfit for memorable holiday photos!
Pattern #: LW3681
Designed by Tammy Hildebrand
Project Type: Baby/Child, Seasonal, Christmas
Skill Level: Experience
- RED HEART® Anne Geddes Baby™: 3 (3, 4) balls 301 Teddy A; 1 ball each 100 Lily B, 902 Ladybug C and 691 Grass D
- Susan Bates® Crochet Hook: 4mm [US G-6]
- Stitch markers
- Yarn needle
Additional Supplies Needed:
24 (27, 30) ½” (12mm) buttons to match A; One ½” (12mm) button to match D; Sewing needle and thread to match
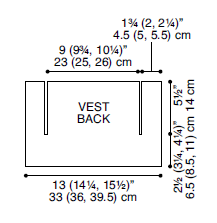
Vest measures 13 (14½, 15½)” [33 (37, 39.5) cm] chest plus 3” (7.5 cm) edging x 9½ (10½, 11½)” [24 (26.5, 29) cm] long with edging.
Beanie measures 14 (17, 20)” [35.5 (43, 51 cm] circumference.
sc2tog = [Insert hook in next stitch, yarn over and pull up a loop] twice, yarn over and draw through all 3 loops on hook.
FPsc (front post single crochet) = Insert hook from front to back and to front again around post of indicated stitch, yarn over and draw up a loop, yarn over and draw through 2 loops on your hook.
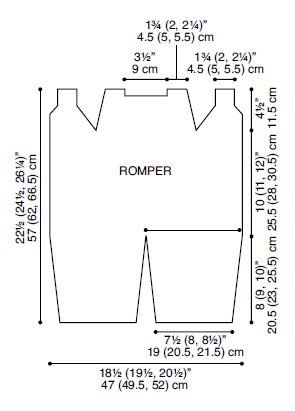
1. Romper is worked from bottom of left leg up, then right leg is worked from bottom up. Body is worked across both legs, split for right front, back, and left front, then seamed at shoulders.
2. Vest is made from bottom up, splitting for right front, back, and left front, and then seamed at the shoulders.
3. Pay close attention to correct placement of FPsc in rick rack rows as some FPsc are worked 1 row below and others 2 rows below.
4. Do not turn, join, or fasten off unless instructed to do so.
With A, ch 27 (29, 31).
Row 1 (right side): Sc in 2nd ch from hook and each ch, turn—26 (28, 30) sc.
Rows 2–10: Ch 1, sc in each st, turn.
Row 11: Ch 1, 2 sc in first st, sc in each st to last st, 2 sc in last st, turn—28 (30, 32) sc.
Rows 12–31: Repeat Rows 2–11 twice—32 (34, 36) sc.
Rows 32–34 (38, 42): Repeat Row 2. Fasten off at end of Row 34 (38, 42).
Repeat Rows 1–34 (38, 42) of left leg. Do not fasten off at end of Row 34 (38, 42).
Row 1 (right side): Ch 1, sc in each st; with right side facing, sc in each st of left leg, turn—64 (68, 72) sc.
Rows 2–42 (46, 50): Ch 1, sc in each st, turn.
Row 1 (right side): Ch 1, sc in first 16 (17, 18) sts, turn; leave remaining sts unworked—16 (17, 18) sc.
Row 2: Ch 1, sc in each st, turn.
Row 3: Ch 1, sc in each st to last 2 sts, sc2tog, turn—15 (16, 17) sc.
Row 4: Ch 1, sc in each st, turn.
Rows 5–10: Repeat Rows 3 and 4 three times—12 (13, 14) sc.
Rows 11-13: Ch 1, sc2tog, sc in each st to last 2 sts, sc2tog, turn—6 (7, 8) sc.
Rows 14–19: Ch 1, sc in each st, turn. Fasten off at end of Row 19.
Row 1: Sc in next 29 (31, 33) sts; leave remaining sts unworked, turn—30 (32, 34) sc.
Rows 2-4: Ch 1, sc in each st, turn.
Row 5: Ch 1, sc2tog, sc in each st to last 2 sts, sc2tog, turn—28 (30, 32) sc.
Rows 6-13: Repeat Rows 2-5 twice—24 (26, 28) sc.
Rows 14-16: Ch 1, sc in each st, turn.
Row 1 (right side): Ch 1, sc in first 6 (7, 8) sts; leave remaining sts unworked – 6 (7, 8) sc.
Rows 2-3: Ch 1, sc in each st, turn. Fasten off at end of Row 3.
With right side of back facing, skip next 12 sts and join A with sc in next st.
Row 1: Sc in next 5 (6, 7) sts, turn—6 (7, 8).
Rows 2-3: Ch 1, sc in each st, turn. Fasten off at end of Row 3.
With right side of body facing, skip next st of Row 42 (46, 50) and join A with sc in next st.
Row 1: Sc in each st, turn—16 (17, 18) sc.
Row 2: Ch 1, sc in each st, turn.
Row 3: Ch 1, sc2tog, sc in each st, turn—15 (16, 17) sc.
Row 4: Ch 1, sc in each st, turn.
Rows 5–10: Repeat Rows 3 and 4 three times—12 (13, 14) sc.
Rows 11-13: Ch 1, sc2tog, sc in each st to last 2 sts, sc2tog, turn—6 (7, 8) sc.
Rows 14–19: Ch 1, sc in each st, turn. Fasten off at end of Row 19.
Sew fronts to shoulders.
With right side and front of right leg facing, join A with sc in end of Row 1.
Row 1: Working across ends of rows, sc 97 (106, 112) sts evenly up front of right leg, body, front, and shoulder, 12 sts between shoulders, sc 98 (107, 113) sts evenly down front of left shoulder, front, body, and leg, turn—208 (226, 238) sc.
Row 2 (buttonhole row): Ch 1, sc in first 39 sts, *ch 1, skip next st (buttonhole made), sc in next 3 sts; repeat from * 11 12, 13) times, sc in remaining sts, turn—196 (213, 224) sc and 12 (13, 14) buttonholes.
Row 3: Ch 1, sc in each st and ch-1 space—208 (226, 238) sc. Fasten off.
With right side facing, join B with sc around post of first st of Row 1 of front button band.
Row 1: Skip next 2 sts of row previously made, 3 sc in next st, skip next 2 sts, *3 FPsc around next st of Row 1 of front button band, skip next 2 sts of row previously made, 3 sc in next st, skip next 2 sts of Row 1 of front button band; repeat from * to last st, FPsc around last st. Fasten off.
With right side facing and with sewing needle and matching thread, sew 12 (13, 14) buttons on left band under buttonholes.
With right side and back of left leg facing, join A with sc in end of Row 1.
Row 1: Working across ends of rows, sc 33 (37, 41) sts evenly across back of left leg, sc 34 (38, 42) sts evenly across back of right leg, turn—68 (76, 84) sc.
Row 2 (buttonhole row): Ch 1, sc in first 2 sts, *ch 1, skip next st (buttonhole made), sc in next 5 sts; repeat from * 5 (6, 7) times,* sc in next 8 (6, 4) sts; repeat from * to * once; sc in remaining sts, turn—56 (72, 68) sc and 12 (14, 16) buttonholes.
Row 3: Ch 1, sc in each st and ch-1 space. Fasten off.
With wrong side facing and with sewing needle and matching thread, sew 6 (7, 8) buttons on each leg centered on front button band under buttonholes. Fasten buttons through back buttonhole band.
With right side of armhole facing, join A with sc in 8th row below shoulder seam.
Row 1: Working over ends of rows, sc in next 15 rows around shoulder; leave remaining sts unworked, turn—16 sc.
Rows 2-4: Ch 1, sc2tog, sc in each st to last 2 sts, sc2tog, turn—10 sc. Fasten off at end of Row 4.
With right side of armhole facing, join A with sc in first unworked st at underarm.
Round 1: Sc in same st as join, working across ends of rows, sc in each row to sleeve cap, sc in each row of sleeve cap; working in last row of sleeve cap, sc2tog, sc in each st to last 2 sts, sc2tog; working across ends of rows, sc in each row of sleeve cap to last row, 2 sc in last row; join with slip st in first sc—40 sc.
Round 2: Ch 1, sc in each st around; join with slip st in first sc.
Round 3: Ch 1, sc2tog, sc in each st up to last 2 sts, sc2tog; join with slip st in first st—38 sc.
Round 4: Repeat Round 2.
Rounds 5 and 6: Repeat Rounds 3 and 4—36 sc.
Round 7: Ch 1, sc2tog, sc in each st to shoulder, sc2tog, sc in each remaining st; join with slip st in first st—34 sc.
Round 8: Repeat Round 2.
Rounds 9–16: Repeat Rounds 7 and 8 four times—26 sc.
Round 17: Ch 1, sc2tog, sc in each st to shoulder, [sc2tog] twice, sc in each st to last 2 sts, sc2tog; join with slip st in first st—22 sc.
Round 18: Repeat Round 2.
Rounds 19 and 20: Repeat Rounds 7 and 8 once—20 sc.
Rounds 21–29 (33, 37): Ch 1, sc in each st; join with slip st in first st. Fasten off at end of Round 29 (33, 37).
With right side facing, join B with sc in any st of round previously made.
Round 1: Work 2 sc in same st, *skip next st, working around post of st of Round 27 [31, 35] of sleeve, 3 FPsc around next st, skip next st in round previously made, 3 sc in next st; repeat from * around; join with slip st in first sc. Fasten off.
Body
With C, ch 47 (51, 55).
Row 1 (right side): Sc in 2nd ch from hook and in each ch, turn—46 (50, 54) sc.
Rows 2–10 (14, 18): Ch 1, sc in each st, turn.
Row 1 (right side): Ch 1, sc in first 6 (7, 8) sts; leave remaining sts unworked, turn—6 (7, 8) sc.
Rows 2-24: Repeat Row 1 twenty-three times.
Fasten off at end of Row 24.
With right side facing, skip next st on last row of body and join C with sc in next st.
Row 1: Sc in next 31 (33, 35) sts; leave remaining sts unworked, turn—32 (34, 36) sc.
Rows 2–24: Ch 1, sc in each st, turn. Fasten off at end of Row 24.
Row 1: Sc in next 5 (6, 7) sts—6 (7, 8) sc.
Rows 2-24: Repeat Row 1 twenty-three times.
Fasten off at end of Row 24. Sew fronts to back.
Note: Continue working in rounds. Place markers in indicated sts and move marker up as each round is completed.
With right side facing, join C with sc in end of Row 1 on right front.
Round 1: Working over ends of rows, 4 sc in same space as join, place marker in 3rd st of 5-st group, sc in each row to last row before back, sc2tog over last row and first st of back, sc in each st in back to last st of back, sc2tog over last st and first row of left front, sc in each row of left front to Row 1, 5 sc in Row 1, mark 3rd st of 5-st group, working across opposite side of foundation ch, sc in each ch; join with slip st in first sc, turn—140 (152, 164) sc.
Rounds 2 and 3: Ch 1, *sc in each st to next marked st, 5 sc in marked st; repeat from * once, sc in remaining st; join with slip st in first sc, turn—156 (168, 180) at end of Round 3. Fasten off at end of Round 3.
With right side facing, join B with sc in any st of last round.
Round 1: Work 2 sc in same st as join, skip next st, working around post of next st of Round 1 of edging, 3 FPsc around next st, skip next st in round previously made, *3 sc in front loop only of next st, skip next st of Round 1 of edging, 3 FPsc around next st, skip next st in round previously made; repeat from * around; join with slip st in first sc. Fasten off.
Note: Continue working in continuous, unturned rounds.
With right side facing, join D with sc in marked st on right front.
Round 1 (right side): Working in skipped sts and unworked back loops behind rick rack, 4 sc in same st as join, sc in each st to next marker, 5 sc in marked st, sc in each st to end; join with slip st in first sc—164 (176, 188) sc. Remove markers.
Rounds 2 and 3: Ch 1, sc in each st; join with slip st in first sc.
Round 4: Ch 1, sc in first 45 st, [sc2tog] 10 times across back, sc in each remaining st; join with slip st in first sc. Fasten off.
With right side of right armhole facing, join Cwith sc in skipped st between front and back.
Round 1: Working over ends of rows of armhole, sc in each row; join with slip st in first sc. Fasten off.
Repeat for left armhole.
First Half
With D, ch 4.
Row 1 (right side): Sc in 2nd ch from hook and each ch, turn—3 sc.
Row 2: Ch 1, sc in each st, turn.
Row 3: Ch 1, 2 sc in first st, sc in each st to last st, 2 sc in last st, turn—5 sc.
Rows 4-7: Repeat Rows 2 and 3 twice—9 sc.
Rows 8-11: Repeat Row 2 four times.
Row 12: Ch 1, sc2tog, sc in each st to last 2 sts, sc2tog, turn—7 sc.
Row 13: Repeat Row 2.
Rows 14–17: Repeat Rows 12 and 13 twice—3 sc.
Fold first half in half, matching sts of Rows 1 and 17.
Row 1 (right side): Ch 1, sc in each st across, turn.
Rows 2-17: Repeat Rows 2-17 of first half. Do not fasten off.
Pivot bowtie to work in ends of rows, ch 1, sc in each row of first side. Fasten off. Join D to first row of opposite side, working in ends of rows, ch 1, sc in each row. Fasten off, leaving long tail for sewing. Fold second half in half and sew Row 17 to center of bow.
With D, ch 4.
Row 1 (right side): Sc in 2nd ch from hook and in each ch, turn—3 sc.
Row 2: Ch 1, sc in each st, turn.
Repeat Row 2 until strap measures approximately 11” (28 cm).
Buttonhole Row: Ch 1, sc in first st, ch 1, skip next st, sc in last st, turn—2 sc.
Repeat Row 2 until strap measures approximately 12” (30.5 cm). Fasten off. With sewing needle and matching thread, sew one button to opposite end from buttonhole. Center strap to back of bow and sew with yarn needle and tail.
Note: Work in continuous rounds. Place marker at beginning of round and move marker up as each round is completed.
With A, ch 3, join with slip st to form ring.
Round 1 (right side): Ch 1, 10 sc in ring—10 sc.
Round 2: 2 sc in first st and in each remaining st—20 sc.
Round 3: Sc in each st.
Round 4: *2 sc in next st, sc in next st; repeat from * around—30 sc.
Round 5: *2 sc in next st, sc in next 2 sts; repeat from * around—40 sc.
Round 6: *2 sc in next st, sc in next 3 sts; repeat from * around—50 sc.
Rounds 7 and 8: Repeat Round 3.
Round 9: *2 sc in next st, sc in next 4 sts; repeat from * around—60 sc.
Round 10: *2 sc in next st, sc in next 5 sts; repeat from * around—70 sc.
Rounds 9-28 (10-30, 11–32): Repeat Round 3 twenty (twenty-one, twenty-two) times.
Round 29 (31, 33): *Sc in next 3 (4, 5) sts, sc2tog; repeat from * around; join with slip st in first sc – 40 (50, 60) sc.
Round 1: Ch 1, working in front loops only, sc in each st; join with slip st in first sc.
Rounds 2-9: Ch 1, sc in each st around, join with slip st in first sc. Fasten off at end of Round 9.
With wrong side of brim facing, join B with sc in any st.
Round 1: Work 2 sc in same st as join, skip next st, working around post of next st of Round 7 of brim, 3 FPsc around next st, *skip next st in round previously made, 3 sc in next st, skip next st, working around post of next st of Round 7 of brim, 3 FPsc around next st; repeat from * around; join with slip st in first sc. Fasten off.
With B, ch 4, join with slip st to form ring.
Round 1 (right side): Ch 1, (sc in ring, ch 1) 6 times—6 sc and 6 ch-1 sps. Fasten off.
Round 2: With right side facing, join C with slip st in any sc, *hdc in next ch-1 space, slip st in next sc; repeat from * 5 times; join with slip st in same sc as first join—6 hdc and 6 slip sts.
Round 3: Ch 1, sc in first slip st, sc in back loop only of next hdc, *sc in next slip st, sc in back loop only of next hdc; repeat from * around, join with slip st in first sc. Fasten off, leaving long tail for sewing.
Sew 1 peppermint candy to center of bow.
Using photograph as a guide, sew 6 candies evenly spaced under rick rack to wrong side of brim.
Weave in ends. Block lightly, if necessary.
ch = chain; hdc = half double crochet; sc= single crochet; sp(s) = space(es); st(s) = stitch(es); ( ) = work directions in parentheses into same st; [ ] = work directions in brackets the number of times specified; * = repeat whatever follows the * as indicated.
Be sure to…
Visit my Website
Join me on Facebook
Subscribe to the Maggie Weldon YouTube Channel for more crochet lesson videos
Subscribe to Maggie’s Crochet YouTube Channel for product reviews
Sign Up for My Newsletter
Follow us on Pinterest
Follow us on Twitter


No Comments