Skill Level: Easy
Supplies:
AUNT LYDIA’S® Metallic Crochet Thread, Size 10: 1 ball 1P White/ Pearl A
Red Heart® Super Saver®: 1 skein each 381 Light Blue B, 313 Aran C, 334 Buff D, 341 Light Grey E and 400 Grey Heather F
Red Heart® Boutique Changes®: 1 ball each 9101 Cream G and 9403 Granite H
Red Heart® Light & Lofty®: 1 skein each 9334 Café Au Lait I and 9316 Puff J
Red Heart® Holiday®: 1 ball 1360 Aran/Gold K
Red Heart® Shimmer®: 1 ball 1010 Snow L
Susan Bates® Crochet Hooks: Size .5 Steel Hook; 5mm [US H-8]
Yarn needle; 18” (45.7 cm) wire wreath frame; 18 – 3” (7.6 cm)
Styrofoam® balls; 12 – 2½” (6 cm)
Styrofoam® balls; 12 – 2” (5 cm)
Styrofoam® balls; 22 gauge stem wire; wire cutters; white glue; rustproof straight pins; wax paper; cork board or foam.
GAUGE: Gauge is not important for this project.
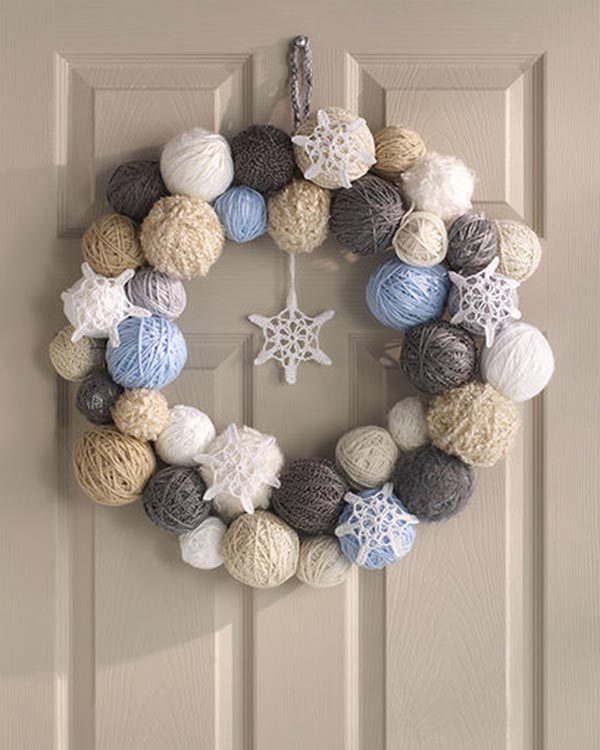
WREATH
Snowflake (Make 6 or desired amount)
With steel hook and A, ch 6.
Round 1: Slip st in 6th ch from hook to form ring, ch 4, tr in ring, ch 3, *2 tr in ring, ch 3, repeat from * 4 times, slip st in top of ch-4.
Round 2: Sc in next tr, *sc in next ch-3 space, ch 10, sc in 4th ch from hook (ch-3 loop made), sc in next 6 chs, sc in same ch-3 space, sc in next tr, ch 5, sc in next tr, repeat from * 4 times, sc in next ch-3 space, ch 10, sc in 4th ch from hook (ch-3 loop made), sc in next 6 chs, sc in same ch-3 space, sc in next st, ch 4, slip st in first sc. Fasten off.
Round 3: Join A with sc in 3rd ch of any ch-5 space, *ch 3, sc in remaining loop of 3rd ch of next ch-10 stem, sc in remaining loop of next 4 chs, 3 sc in ch-3 loop, sc in remaining loop of next 5 chs, ch 3, sc in 3rd ch of next ch-5 space, repeat from * 4 times, ch 3, sc in remaining loop of 3rd ch of next ch-10 stem, sc in remaining loop of next 4 chs, 3 sc in ch-3 loop, sc in remaining loop of next 5 chains, ch 3, slip st in first st. Fasten off.
FINISHING
To block Snowflake: Mix one part water and one part white glue. Cover cork board or foam with wax paper. Submerge each Snowflake in mixture, squeeze out excess liquid. Use straight pins to pin each Snowflake flat on covered cork board or foam. Let dry.
Read the blog with tips and assembly instructions.
Wreath
With yarn colors B–L, wrap yarn around the 3”, 2½” and 2” (7.6, 6 and 5 cm) Styrofoam® balls until foam can no longer be seen. Weave in the loose ends.
With wire cutters, cut stem wire in half. Insert the stem wire through each yarn-wrapped ball about ½” (12.7 mm) from the bottom.
Wreath Assembly
Before attaching the yarn balls to the wire wreath, cluster the yarn balls together in a circle the size of the wire wreath. This will allow you to decide what sizes, colors and textures go well together. Take a picture of your intended design for reference. Attach the yarn balls to the wire wreath, being careful not to wind the wire too tight just in case you need to make a few adjustments and move yarn balls for a better fit. Once the all the yarn balls are in place, tighten and trim the wires on the back of the wreath.
Sew 5 snowflakes around the assembled wreath. With A, make a chain and attach to one point of remaining Snowflake. Attach remaining end of chain to the top center of the wreath.
FINISHING
With size H hook, make a 12″ (30 cm) chain. Insert a stem wire through the chain and attach to the top of the wire wreath for hanging.
ABBREVIATIONS
ch = chain; dc = double crochet; mm = millimeters; sl st = slip stitch; st(s) = stitch(es); tr = treble crochet; yo = yarn over; [ ] = work directions in brackets the number of times specified; * or ** = repeat whatever follows the * or ** as indicated.
Be sure to…
Visit my Website
Join me on Facebook
Subscribe to the Maggie Weldon YouTube Channel for more crochet lesson videos
Subscribe to Maggie’s Crochet YouTube Channel for product reviews
Sign Up for My Newsletter
Follow us on Pinterest
Follow us on Twitter

No Comments